I’ve jumped straight to a finished project post today, mainly because I haven’t processed the fibre completely from a raw fleece so there isn’t a great deal to say about the fibre prep and spinning. I will get around to doing an ‘about Gotland’ post when I work with a larger quantity of this fleece in the future.
Background & Design
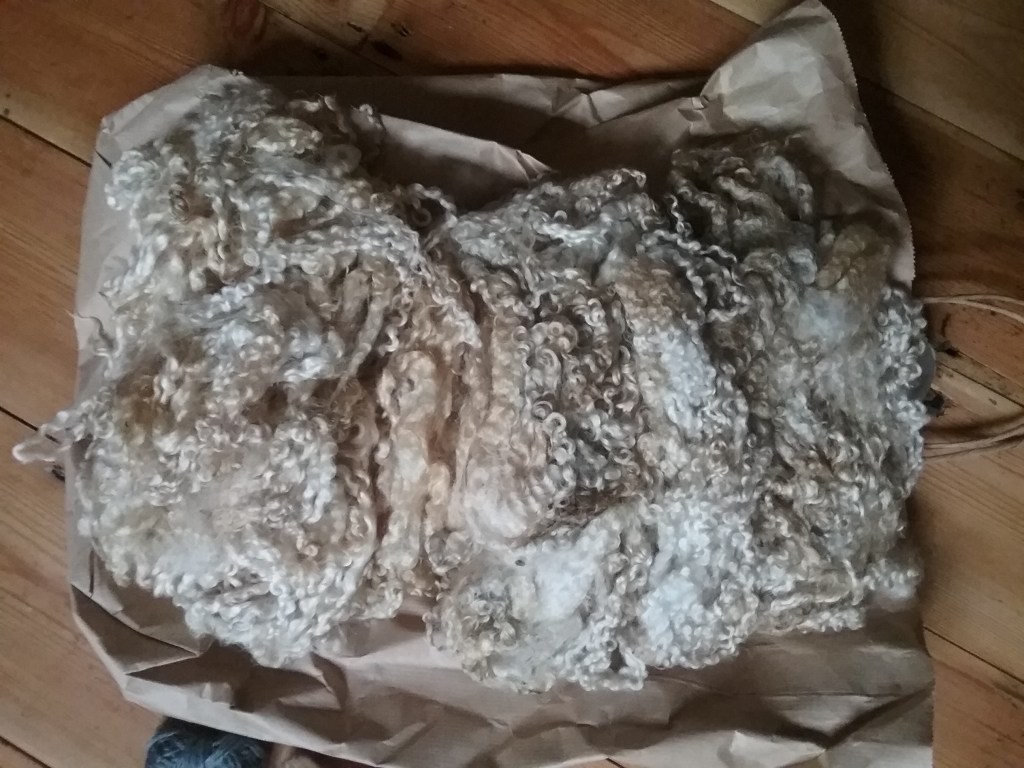
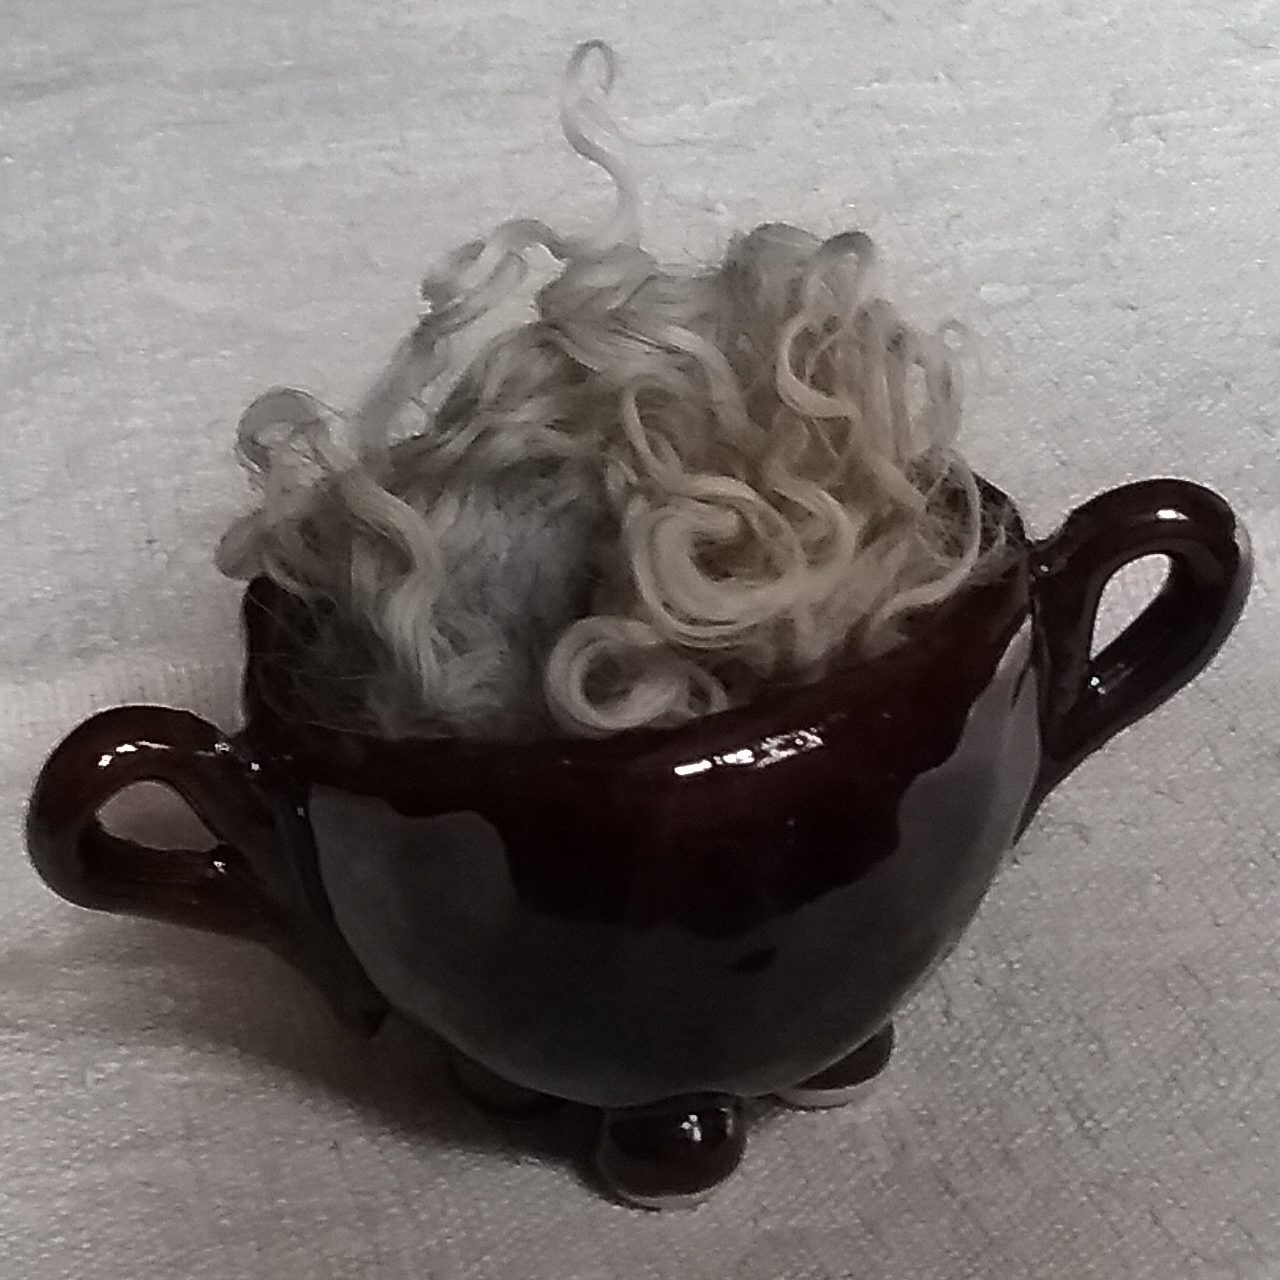
A couple of years ago I knitted a friend some long gloves inspired by Gandalf’s from The Hobbit and instantly thought they would make a really good base for embellishment. That idea sat in the back of mind for some time until I found the perfect combination of fibre. In my 2023 EAYF adventures I purchased some Gotland roving from The Threshing Barn; whole Gotland fleece usually holds quite a premium because of the gorgeous locks, so I thought this roving would be a good experiment. I began spindle spinning and plying the fleece during a university field course and finished it during TDF last year. Gotland has quite a long staple length and the prepared roving was quite slippery, so I found spinning from the fold gave me more control over the diameter of the yarn. Shortly after, I attended a local yarn fair where a vendor was selling small quantities of raw Gotland locks and I remembered my idea of embellishing gloves.
In a happy twist of fate I discovered that Stansborough Grey’s (the sheep belonging to Stansborough Mill in New Zealand who provided the wool fabric for costumes in LOTR) are a breed genetically derived from Gotland sheep, so I felt it was meant to be! While I waited for some wool to dry for my Victorian Jumper over the festive season, I cast on…
Making
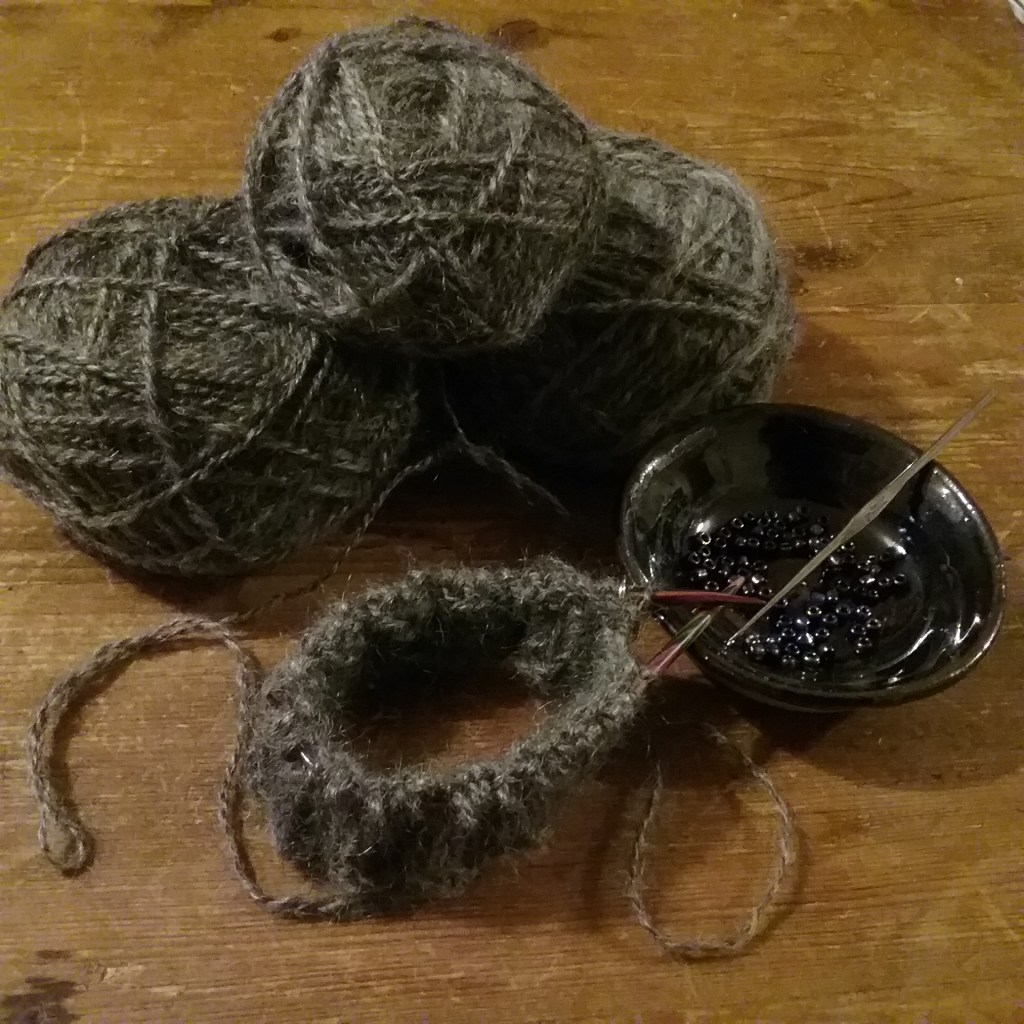
I wanted to put my own wool-witchy spin on the gloves, so opted to add beads to the cuffs. The pattern was a simple stocking stitch with ribbed cuff knitted in the round, divided for the thumb and cast off in an Icelandic bind off. I used 3.5mm mini circular needles which I’d never used before and I’m not sure if I like them – they were fiddly to hold and had a tendency to make my hands ache. I might save them for if I’m travelling with a small knitting project as it was handy not having to worry about dropping stitches when putting them aside.
To jazz up the cuffs I decided to add little beads at random intervals. Since I didn’t know how many beads I would use, I couldn’t pre-thread them onto the yarn, so opted for the method of placing a bead onto a crochet hook and then hooking a stitch and sliding the bead onto it before placing it back on the needle to be knitted.
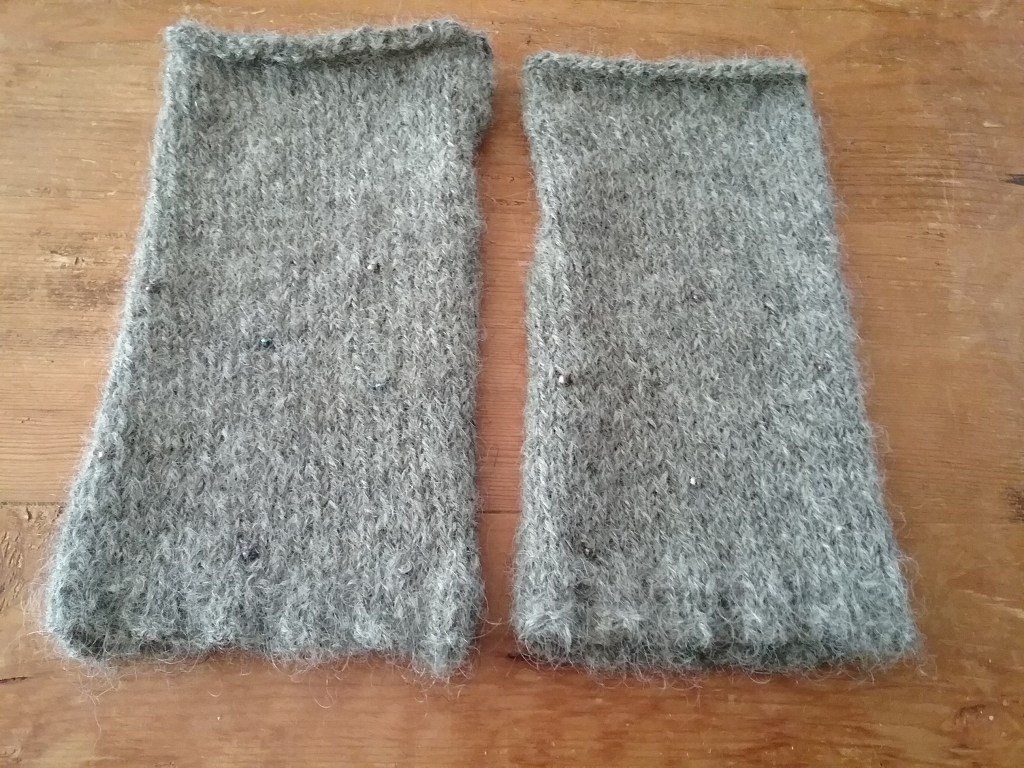
The start of my knitting and little bowl of beadsGloves after Blocking
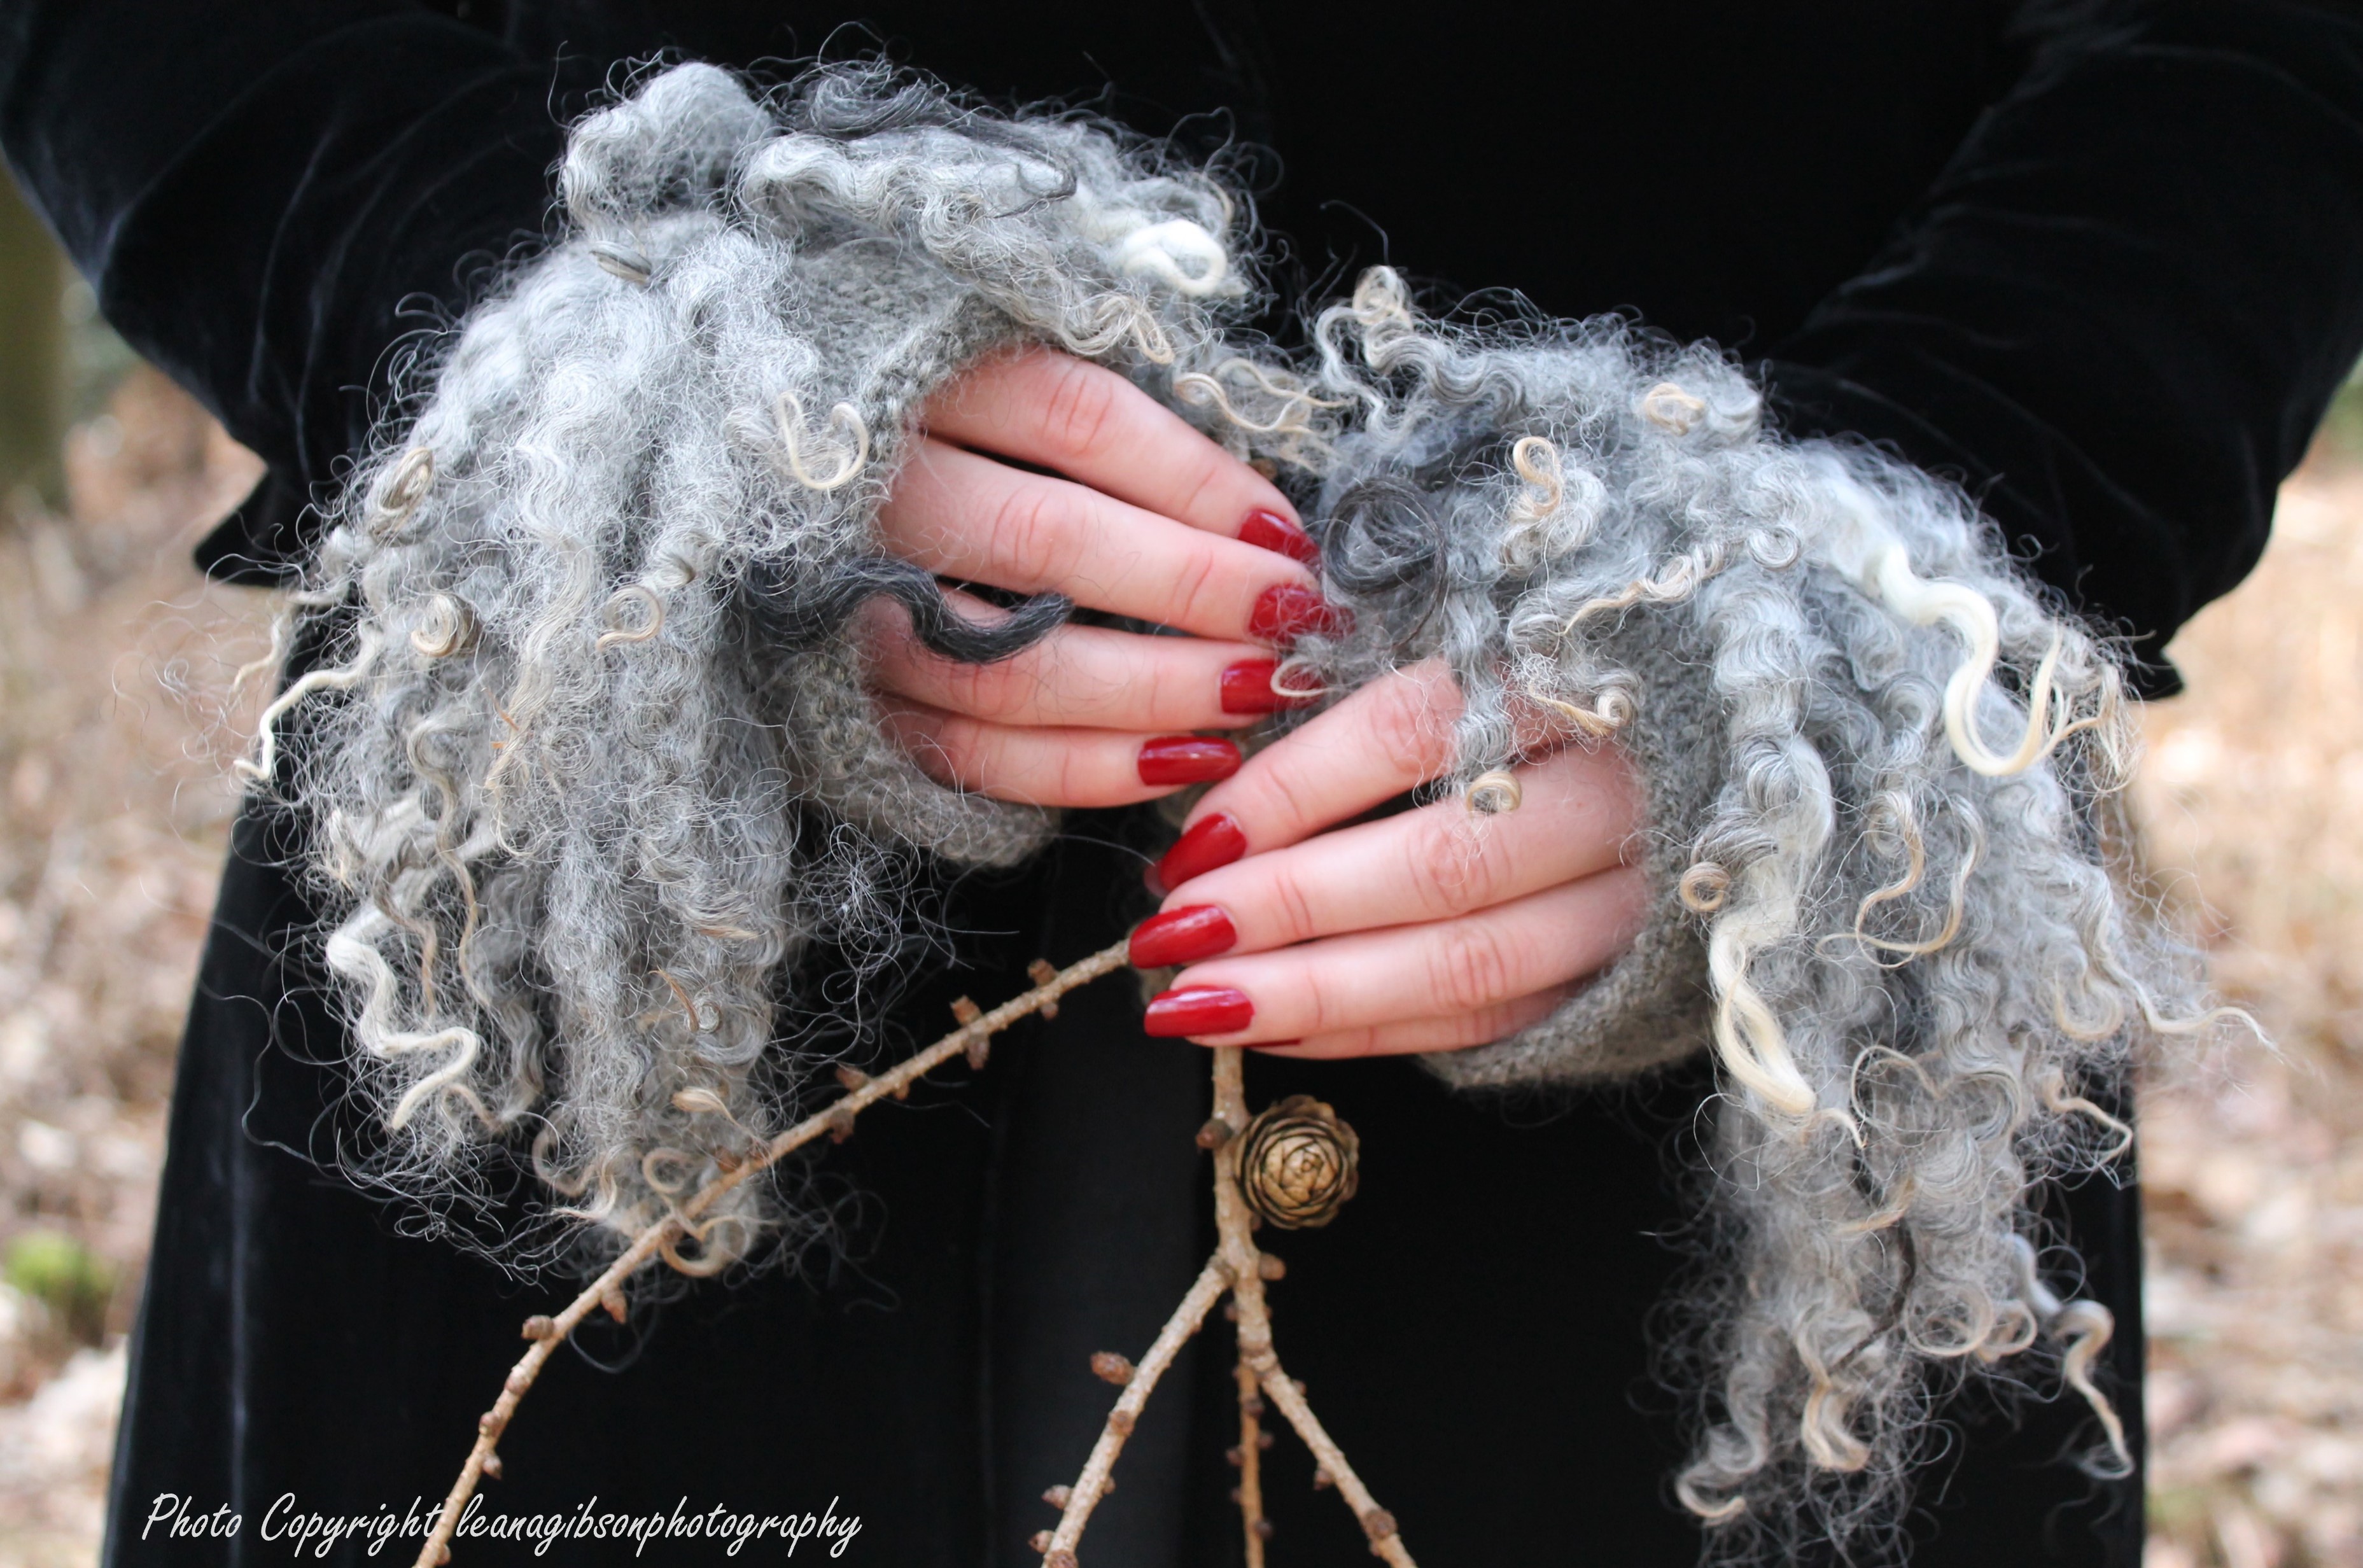
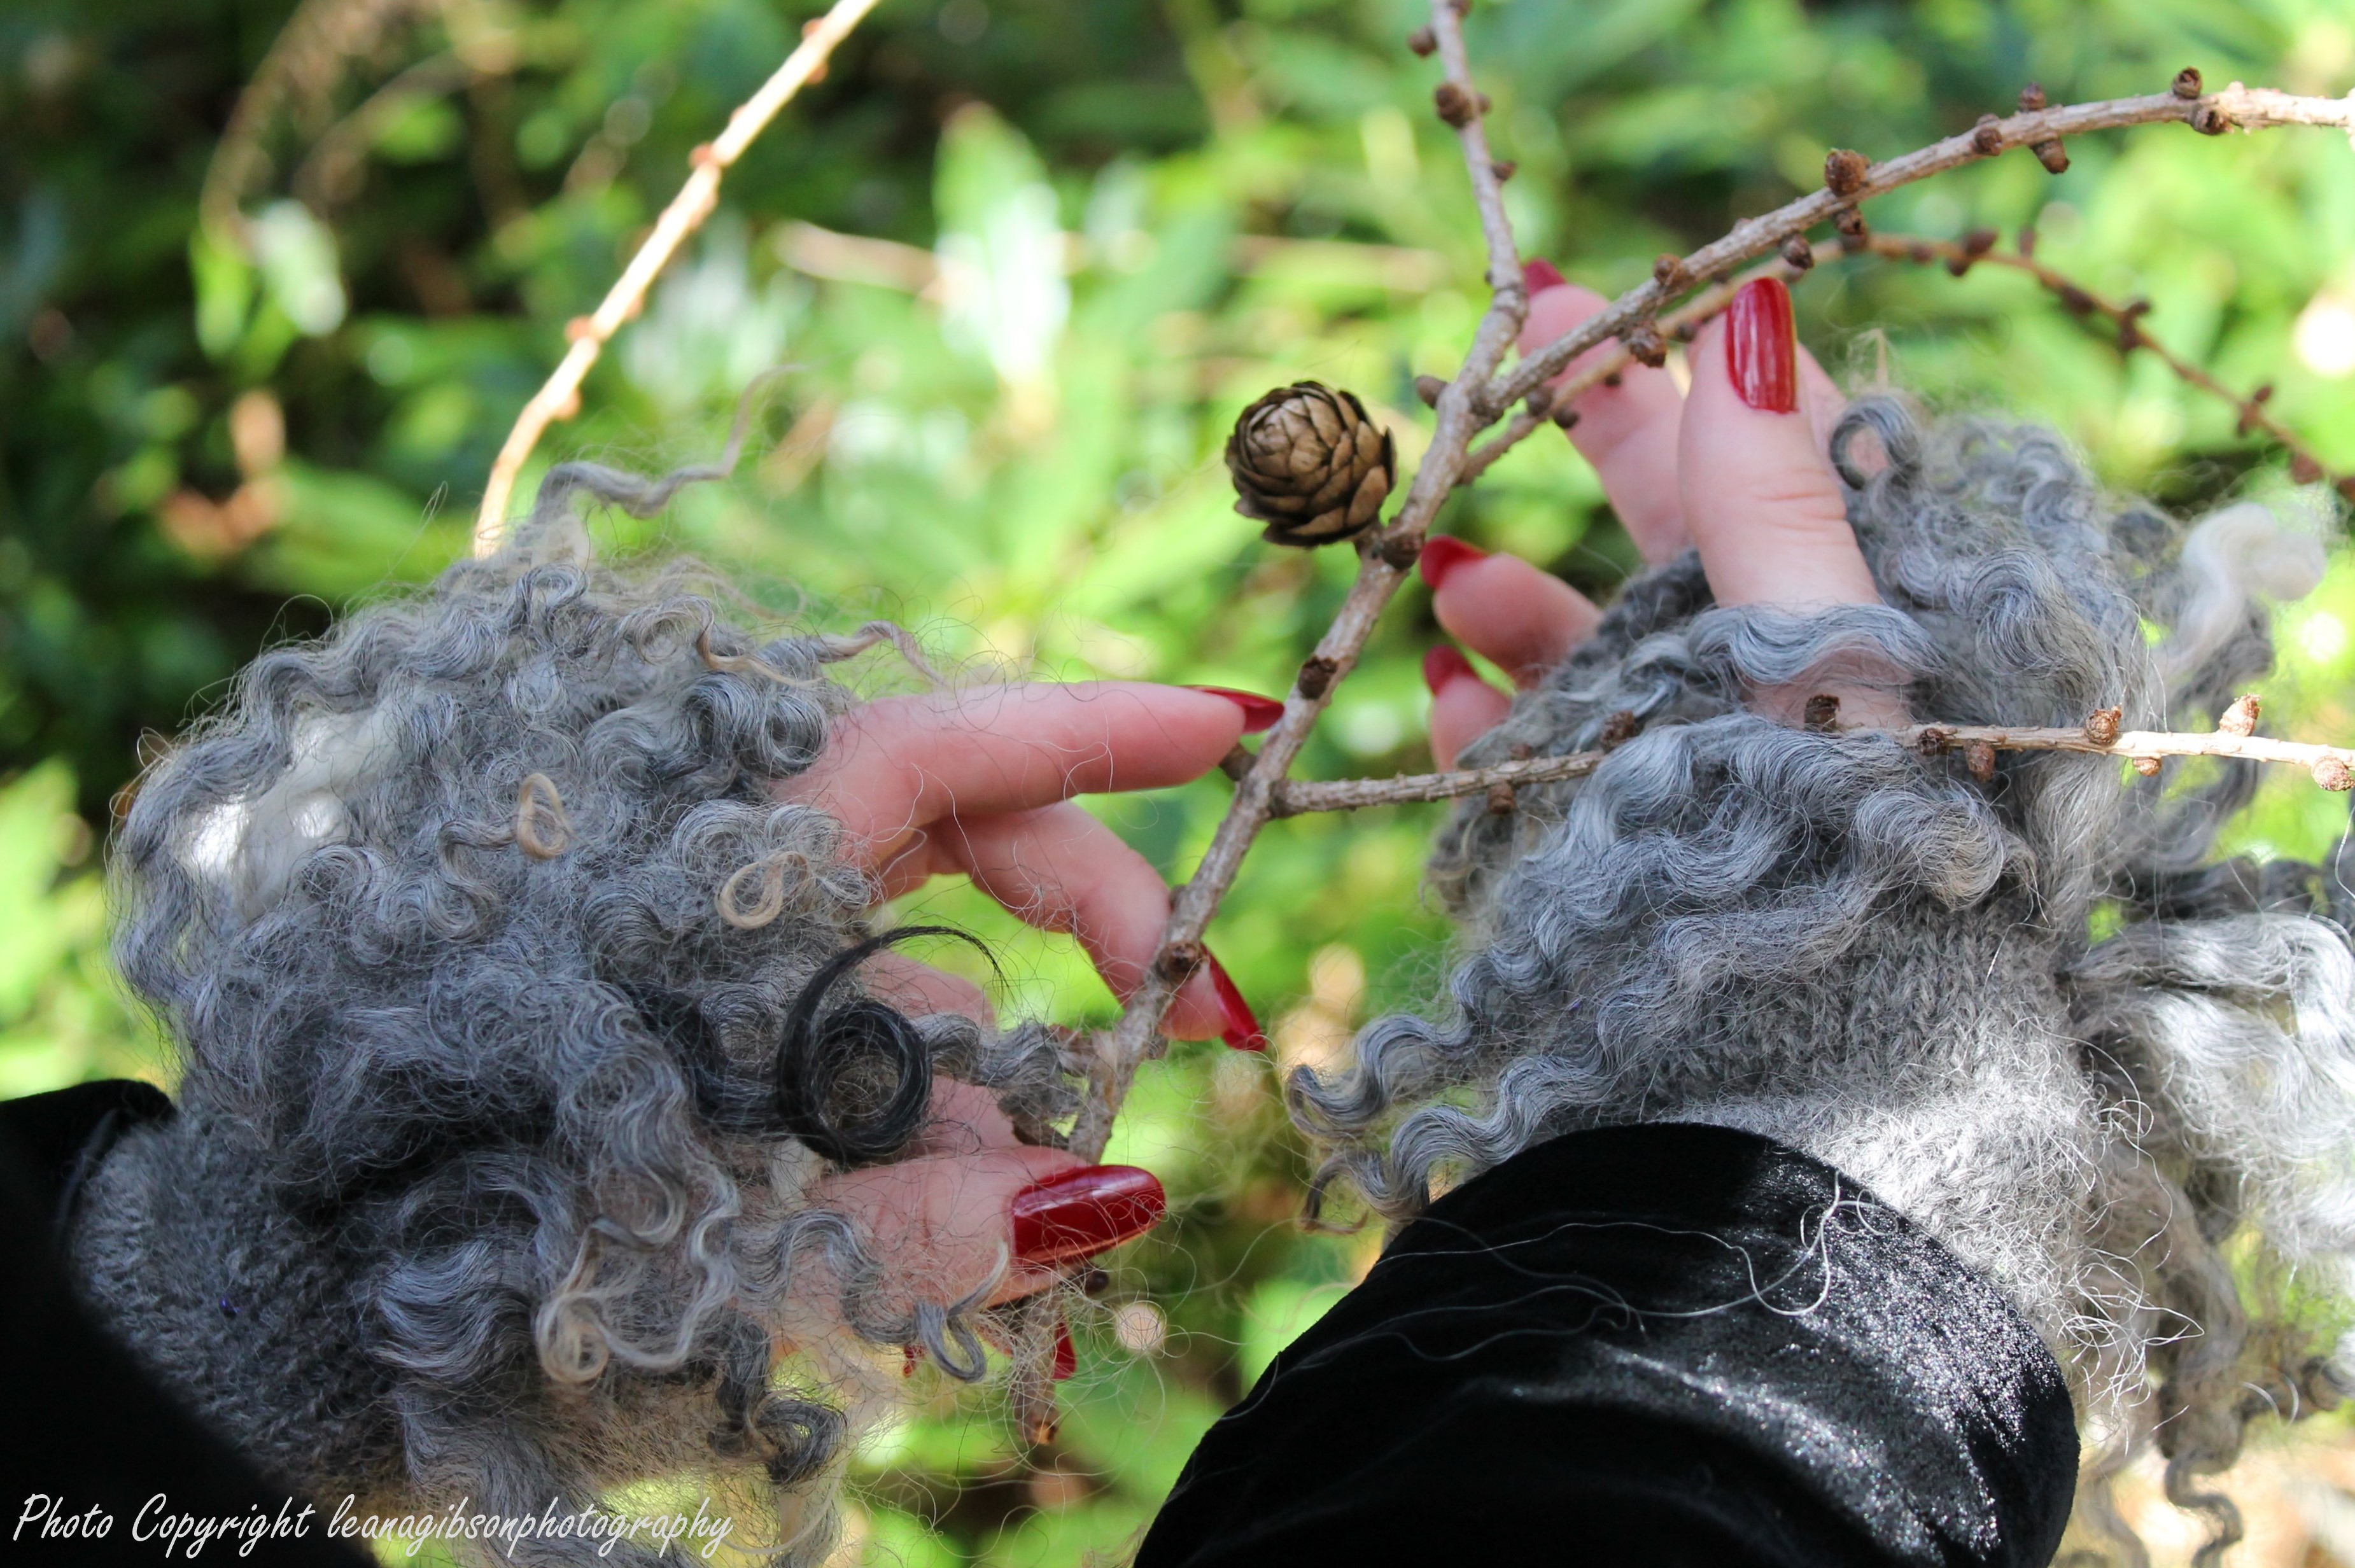
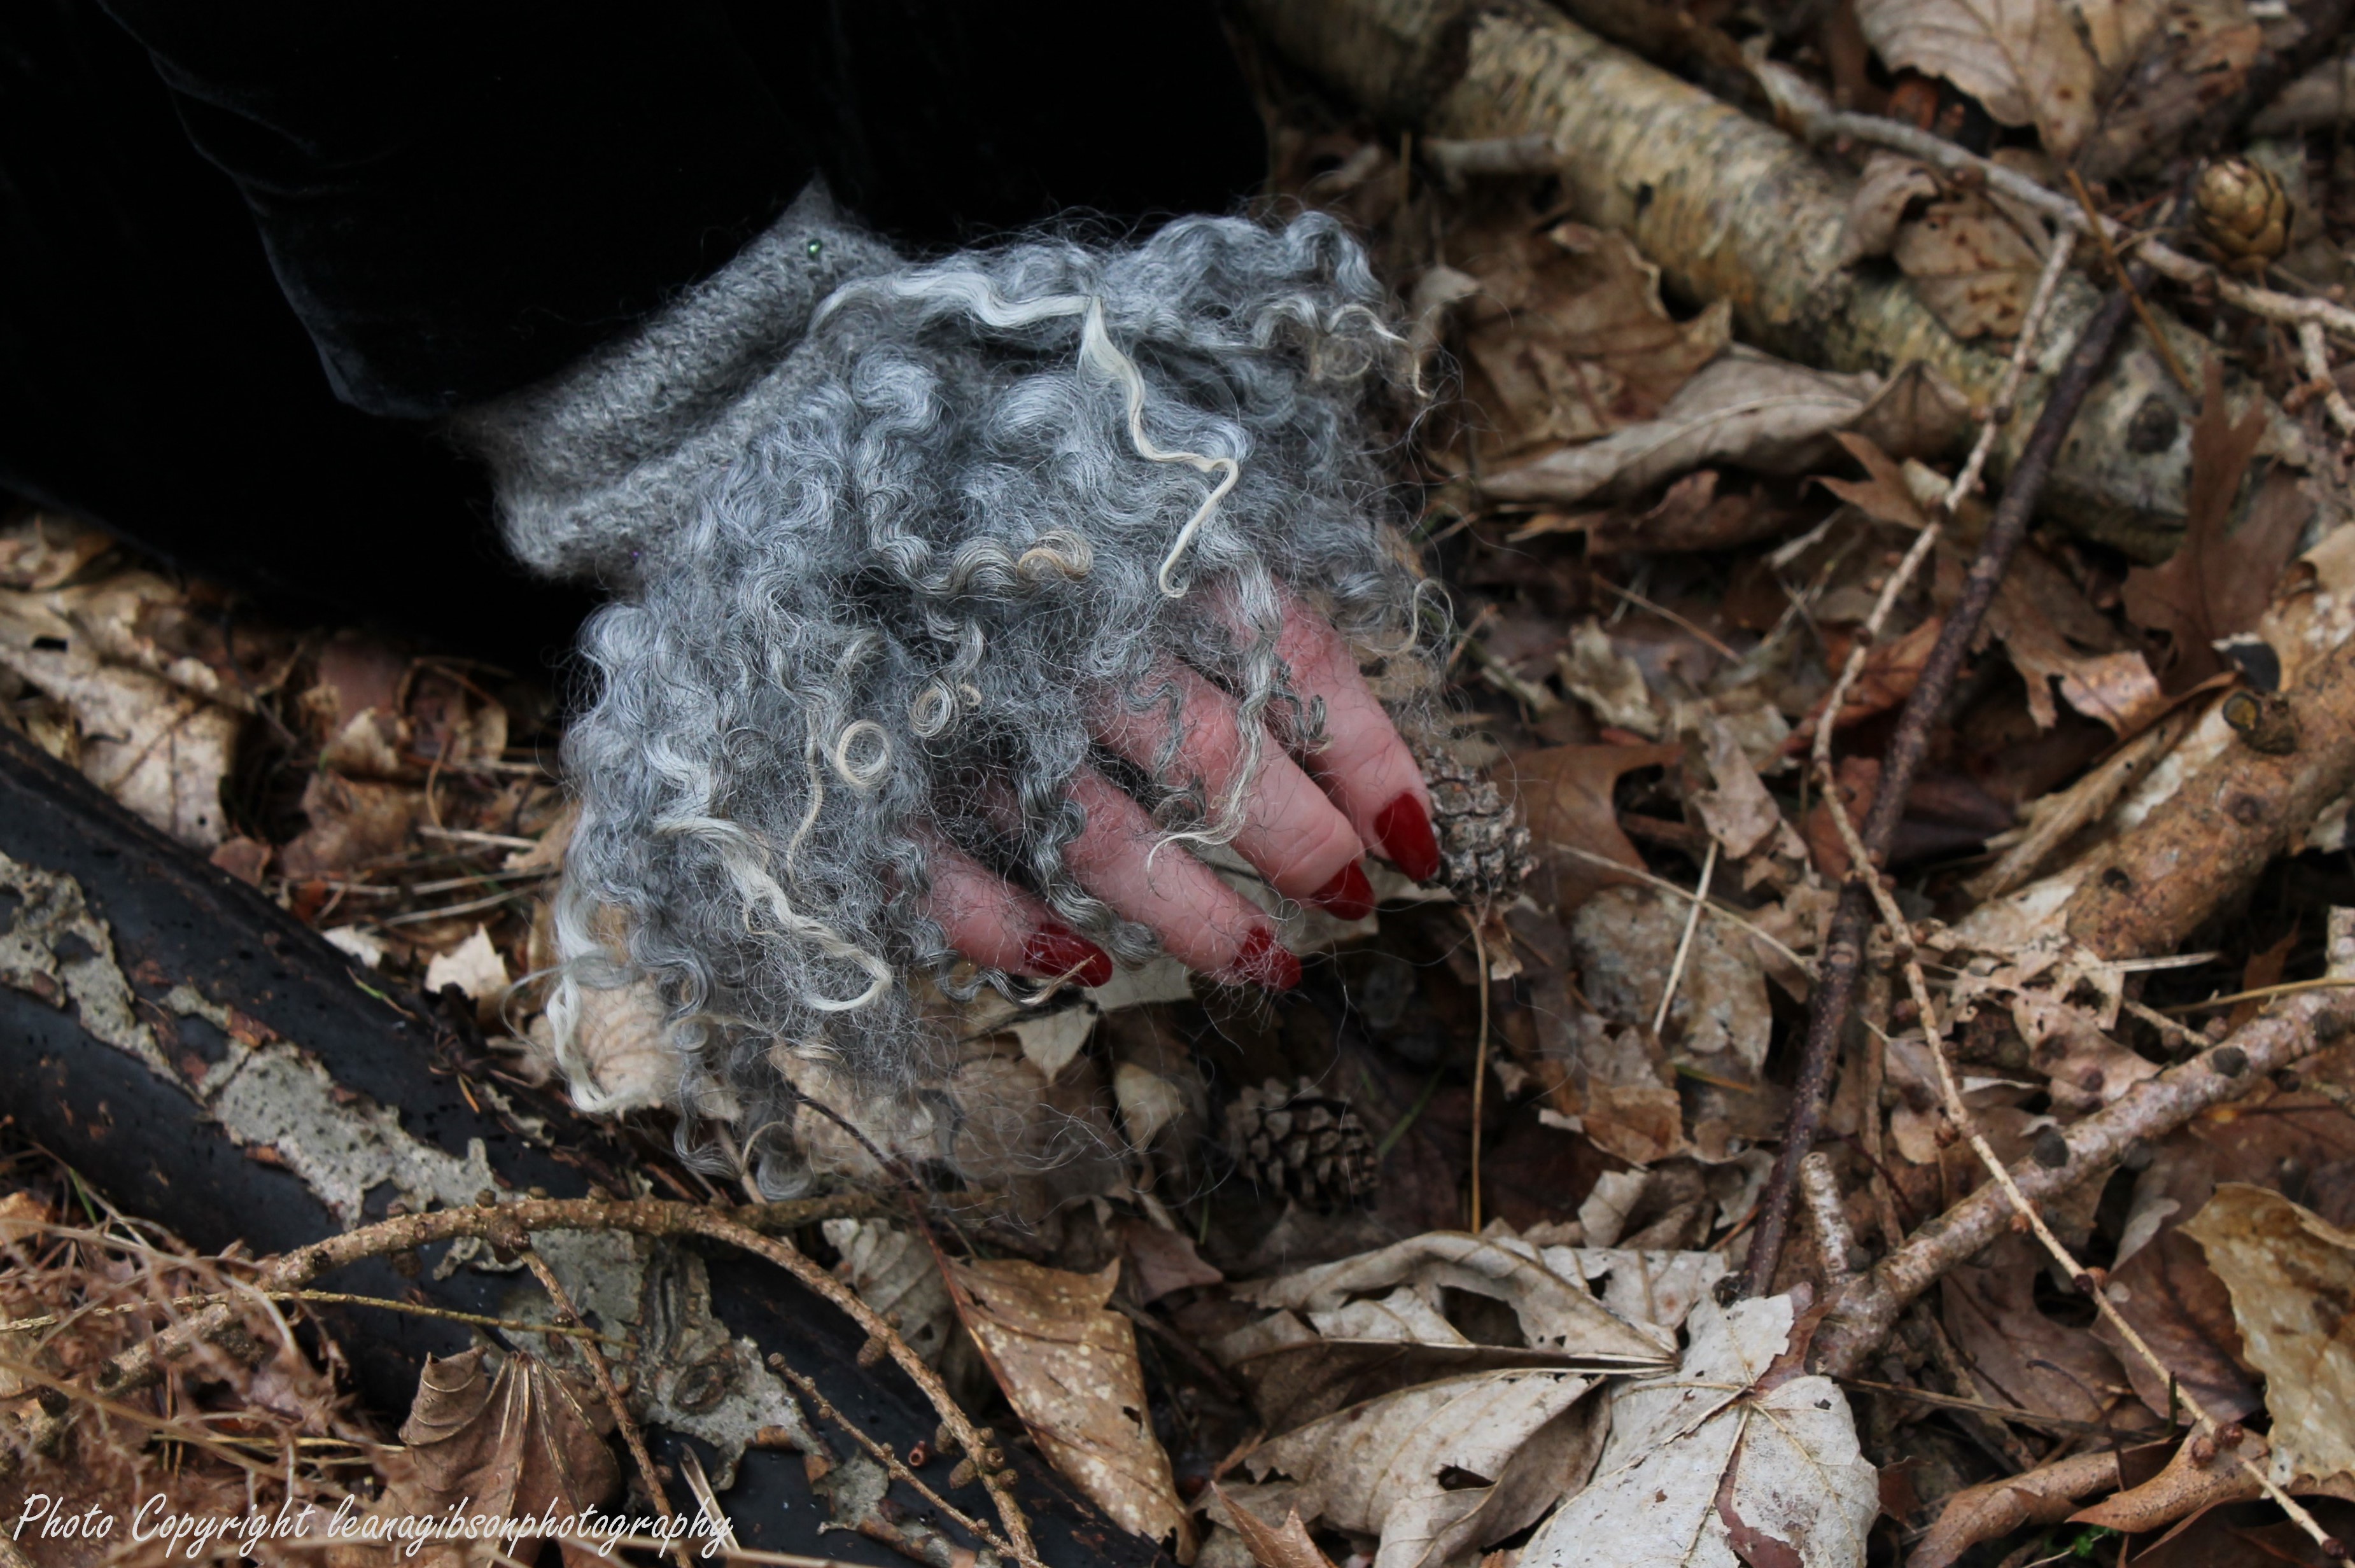
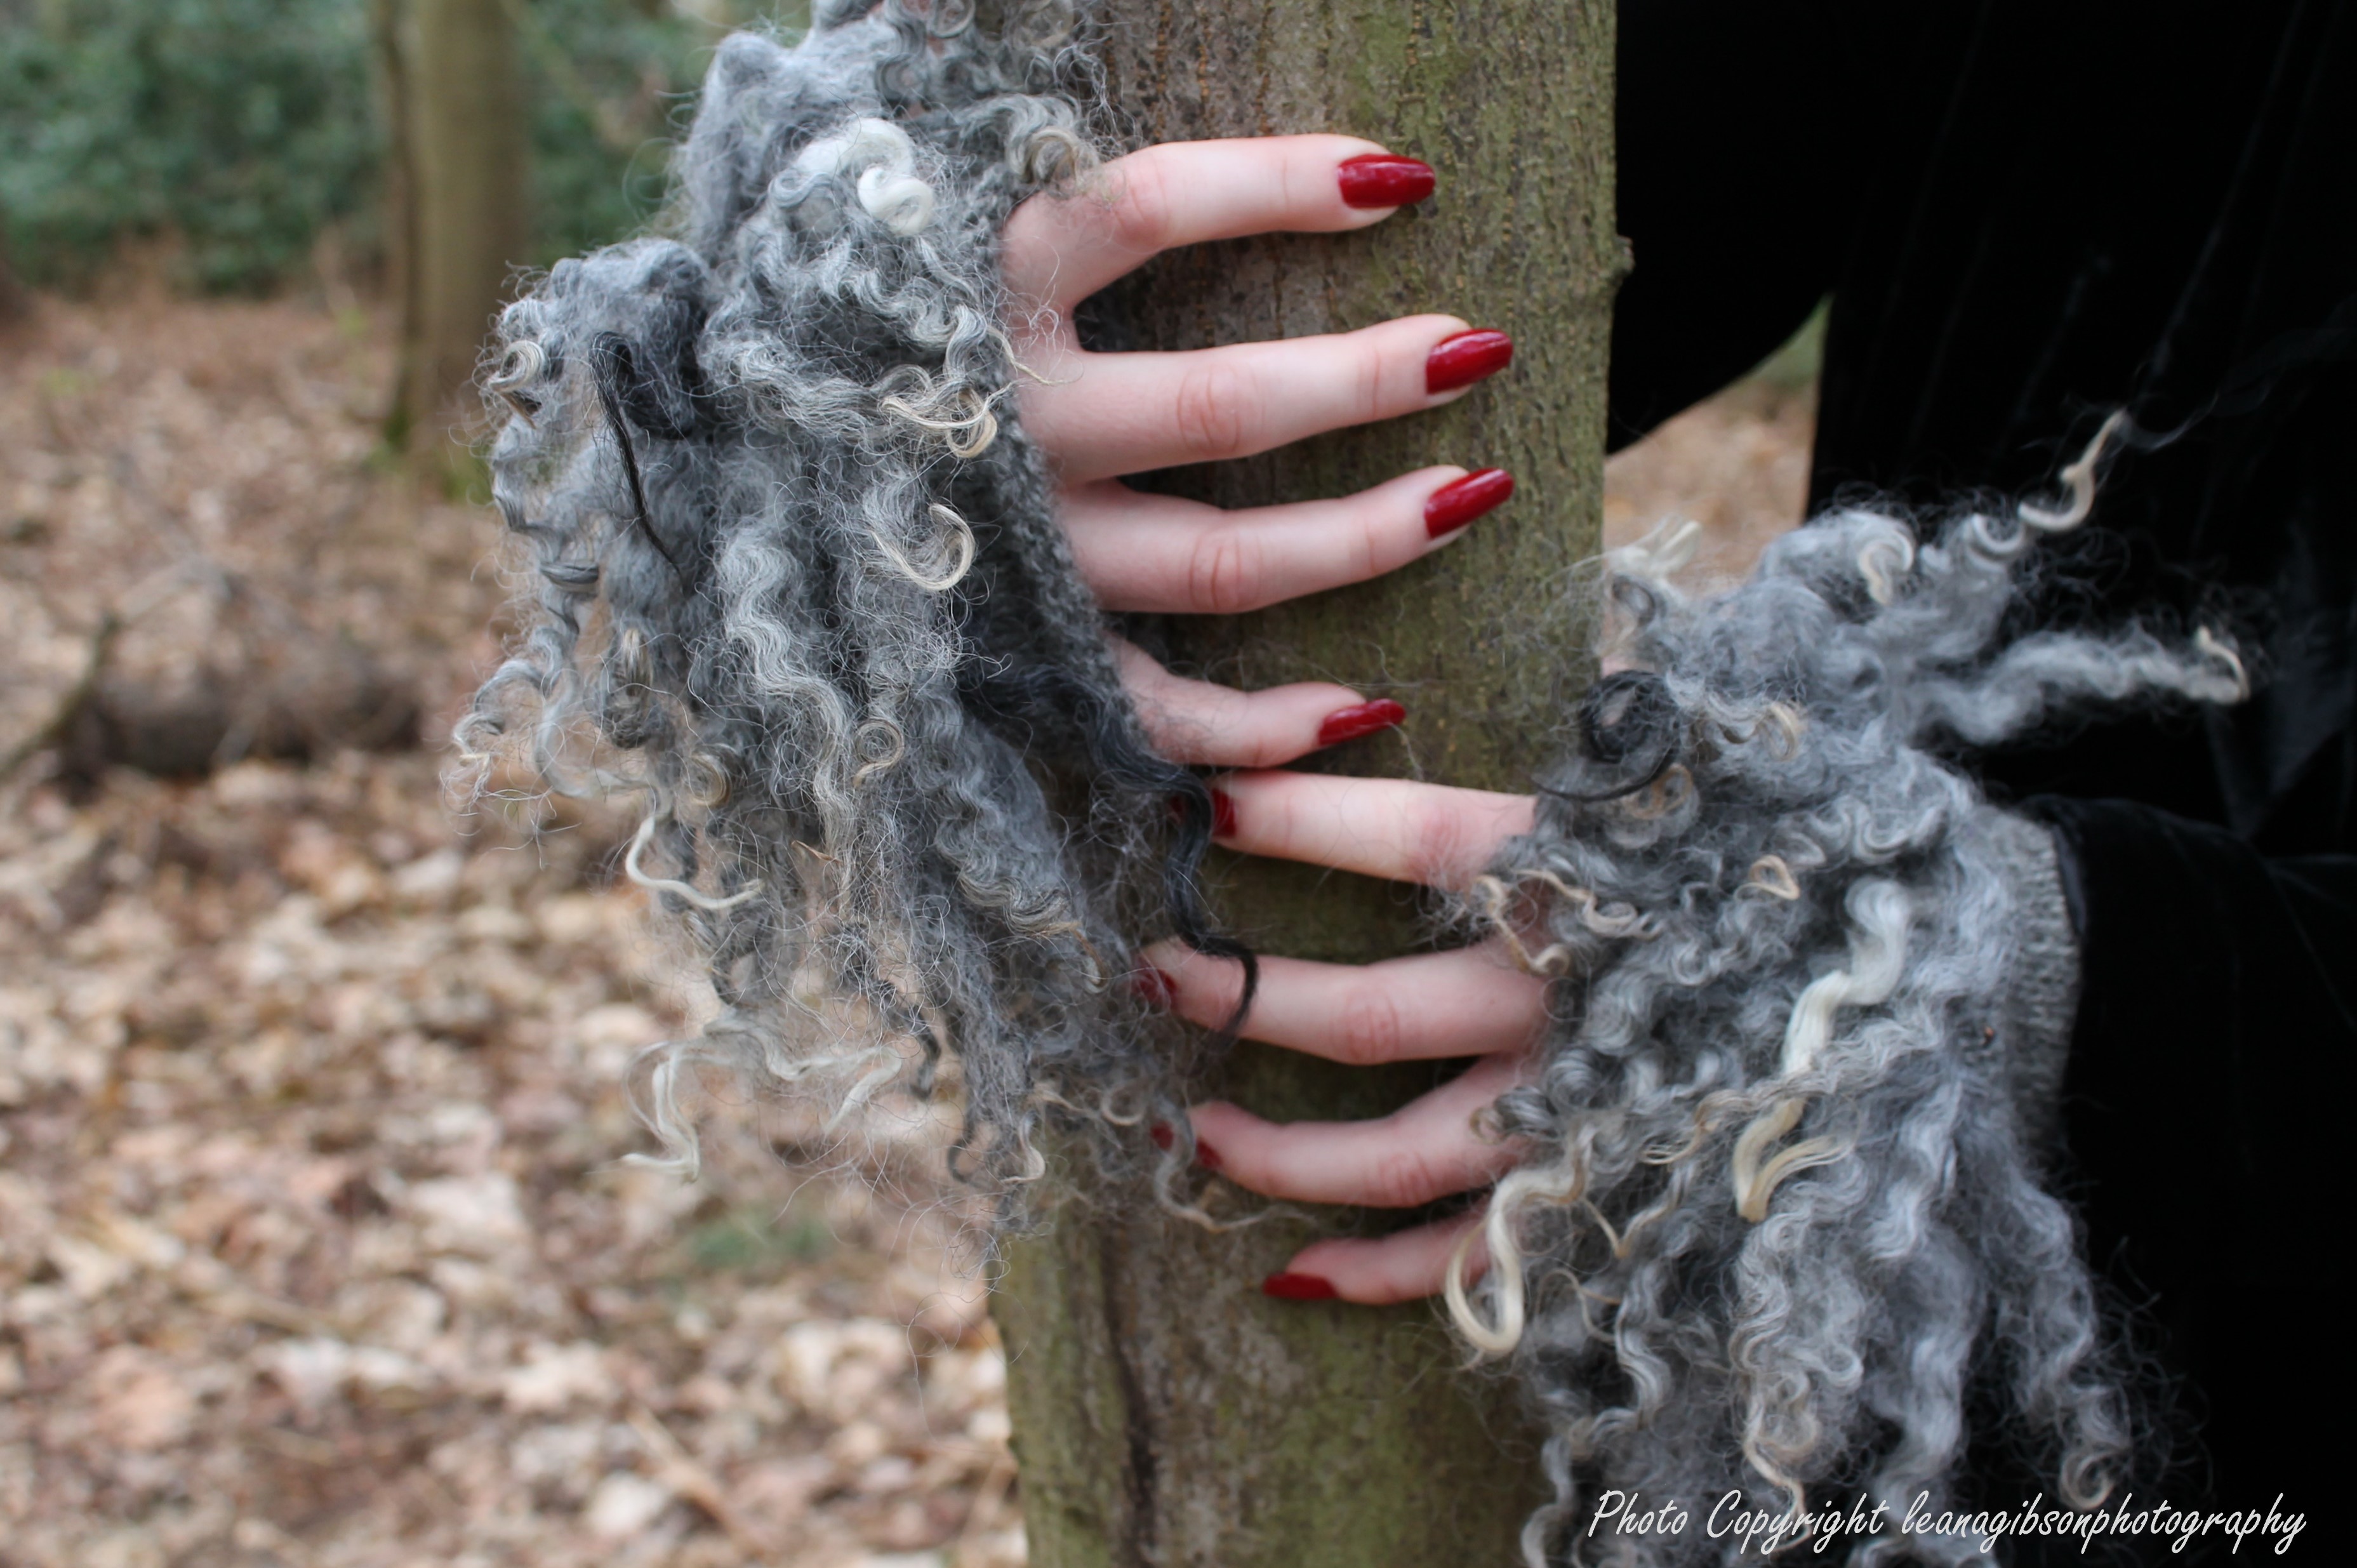
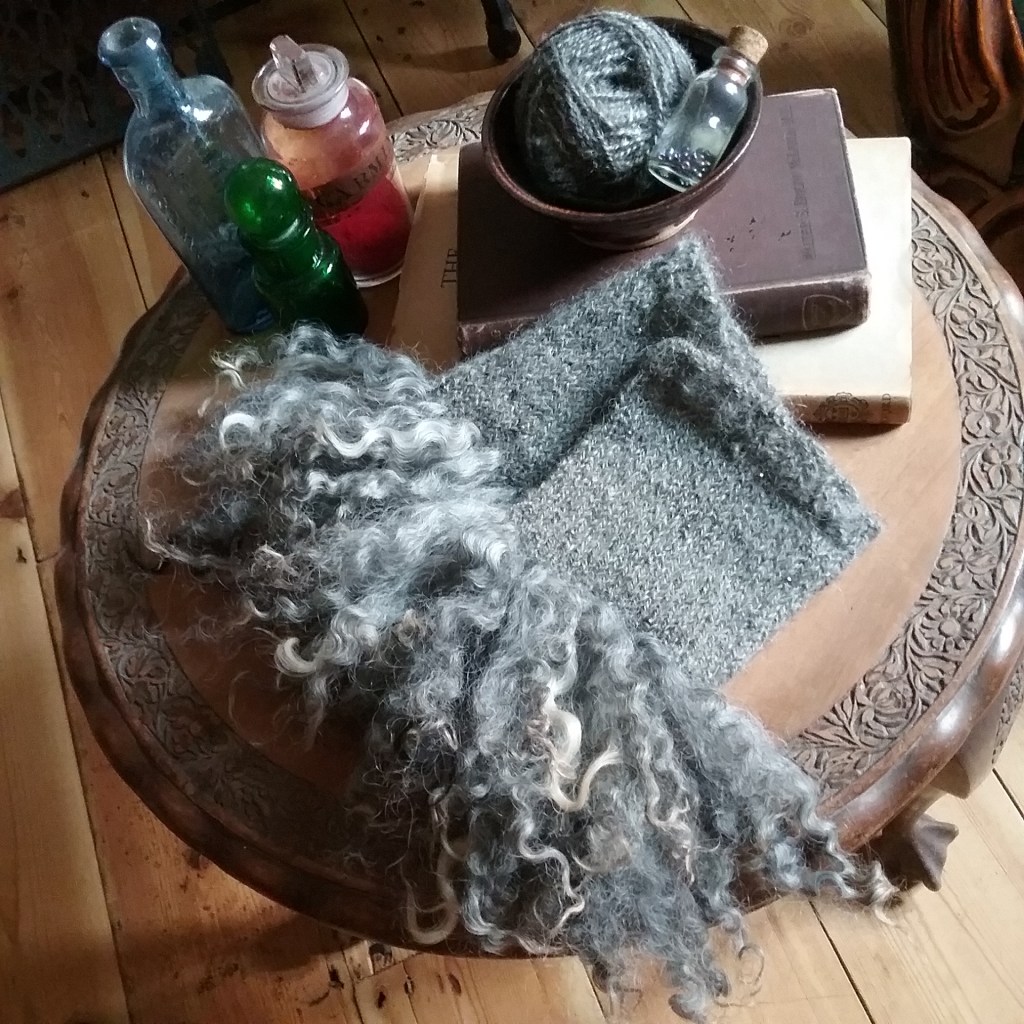
After knitting I washed and blocked the gloves before considering how to add the locks. I’ve seen various methods of securing locks from weaving/knitting them in directly to attaching them using a latch hook, but none of these seemed like they would be very practical for gloves. My handspun Gotland had seemed a willing felter during washing, so I wondered if it might also needlefelt. I placed the glove over a felting brush and used a crochet hook to pull the end of a lock through a stitch and then needlefelted the end of the lock to the glove. It worked surprisingly well, so I continued to place locks across the wrist line on the top half of the glove (I felt the locks would have been impractical on the bottom).
I’ve made a video of the process below and a special shout out to my wonderful friend leanagibsonphotography for taking some stunning pictures!
I am so pleased with how these turned out, they were such good fun to make and even more fun to wear (and I now want to add locks to the cuffs and collars of all my clothes!).
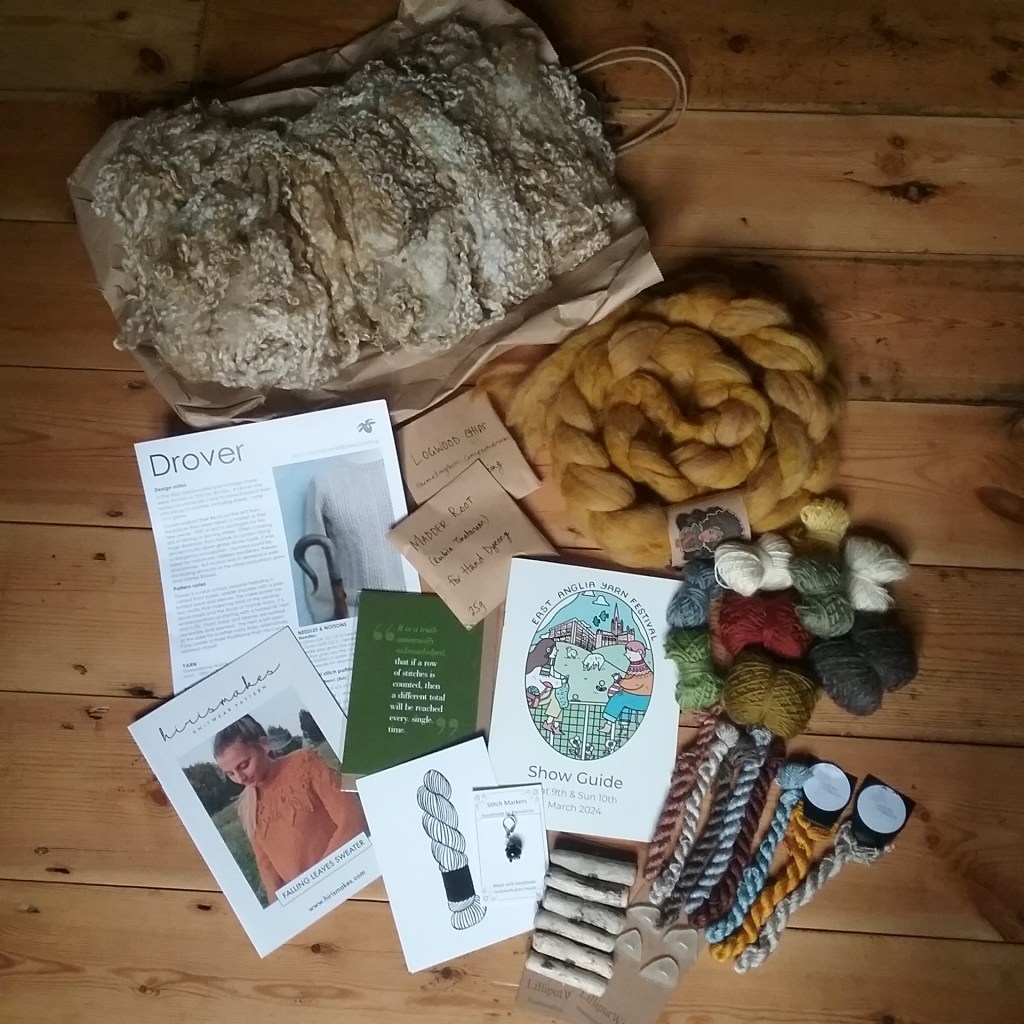
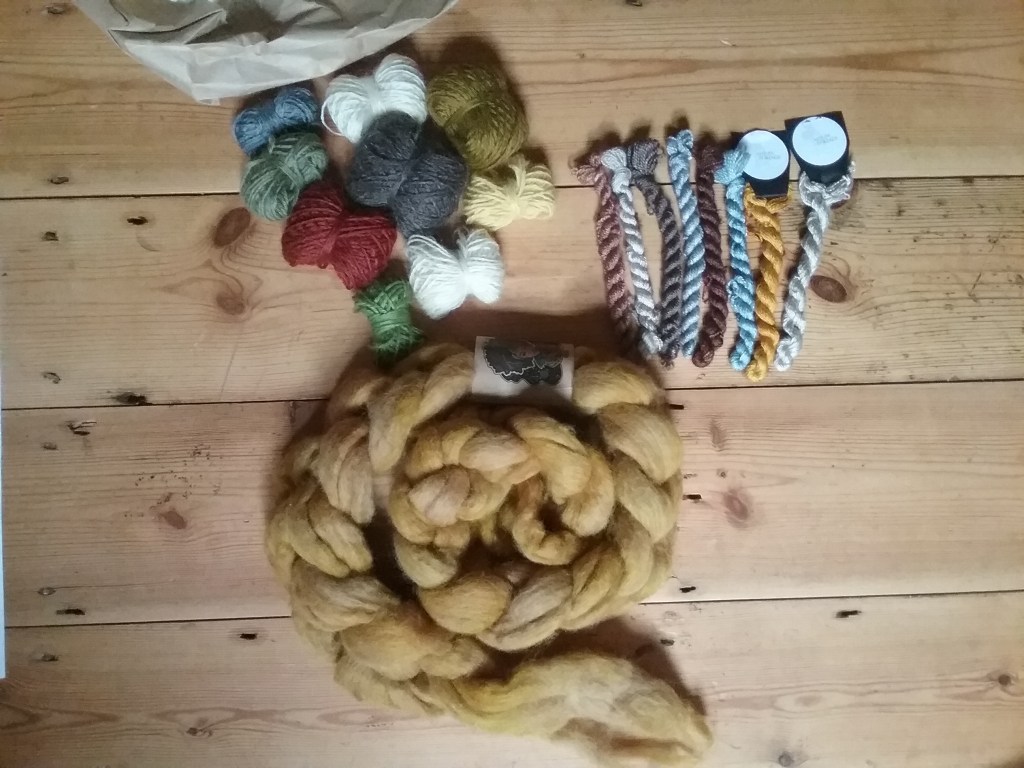
I had a lovely time yesterday at East Anglia Yarn Festival 2024 chatting wool with lovely people and feeling very inspired. Since I have a lot of wool waiting to be spun (and quite a lot of handspun waiting to be used), I was on the lookout for patterns and haberdashery that I could use with my handspun, rather than buying more yarn.
Links to vendors websites are provided for reference and are not affiliate links.
Fibre/Yarn
The Wensleydale sheep shop had some raw Wensleydale wool which will be useful for project plans that need long locks, and while I was there I also picked up some scraps of yarn as they come in handy for repairs and embellishment. I bought some beautiful roving from Yarn Tings which is a BFL/camel blend. I haven’t tried spinning with camel before, so plan to use this as an easy spinning project during tour de fleece this year. I also purchased some naturally dyed silk embroidery threads from Allium Threads and some silk/wool threads from Wild Field Fibre as a gift for my mum this year.
Knitting
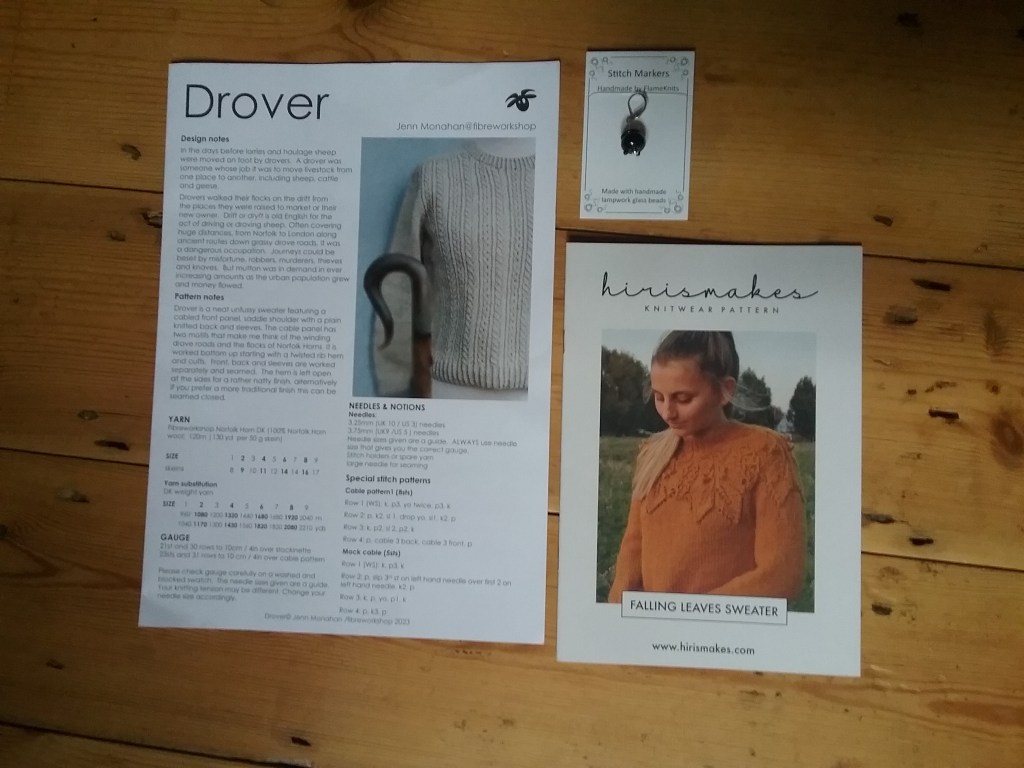
I was on the lookout for knitting patterns, but can be quite fussy when it comes to designs. I loved the look of hirismakes falling leaves sweater and thought it might be a good fit for the Castlemilk moorit fibre I have waiting to be spun. I bumped into Jenn Monahan from fibreworkshop who was one of the first fibre vendors I ever met and purchased her new Drover jumper pattern inspired by the narrow roads sheep used to be transported along. I also treated myself to a handmade glass cauldron stitch marker from Flame Knits.
Miscellany
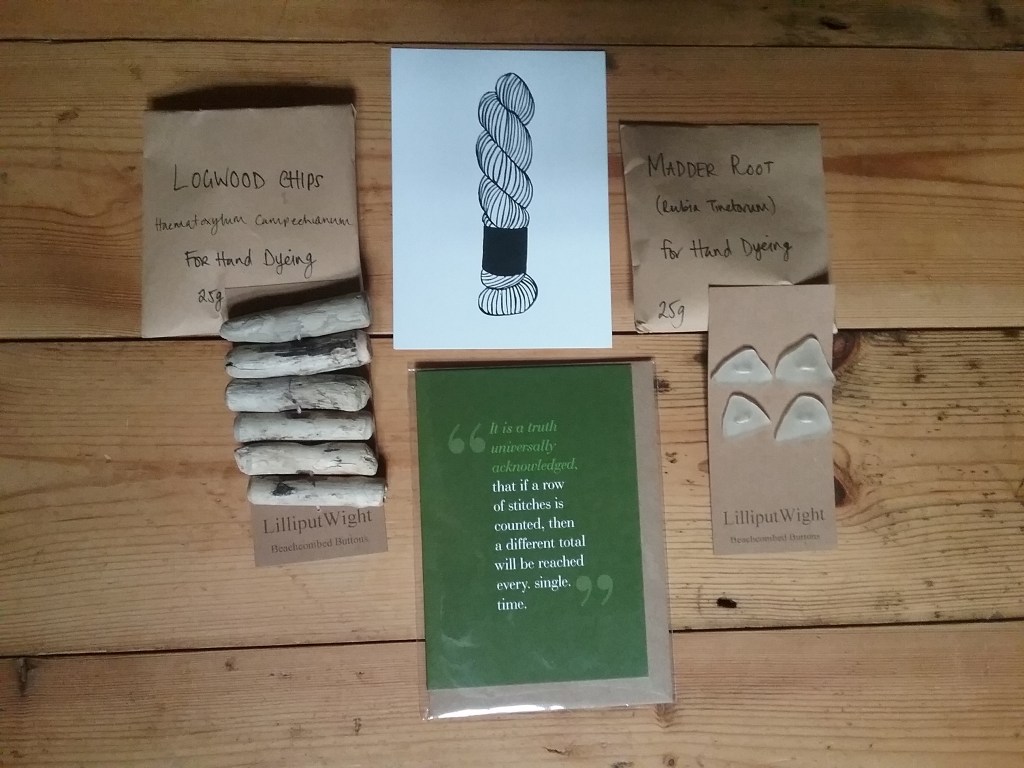
I paid a visit to Lilliput Wight‘s stall for some buttons and saw a card by Tilly Flop Designs that ‘matched’ the one I bought last year. I bought a linocut postcard from Beccy Mundy and finally some madder root and logwood chips from Burnt Fen alpacas which will come in handy for dyeing adventures later on.
Despite coming away with lots of new project inspiration, I do have to tackle some of the smaller projects that have been on my to-do list for a while now that my Victorian jumper is finished (some of them using supplies I bought at EAYF last year!). Much of my time is being taking up studying at the moment, but I hope to be able to have more time to spend crafting soon.
In the meantime, if you have any recommendations of yarn festivals or events then let me know in the comments below.
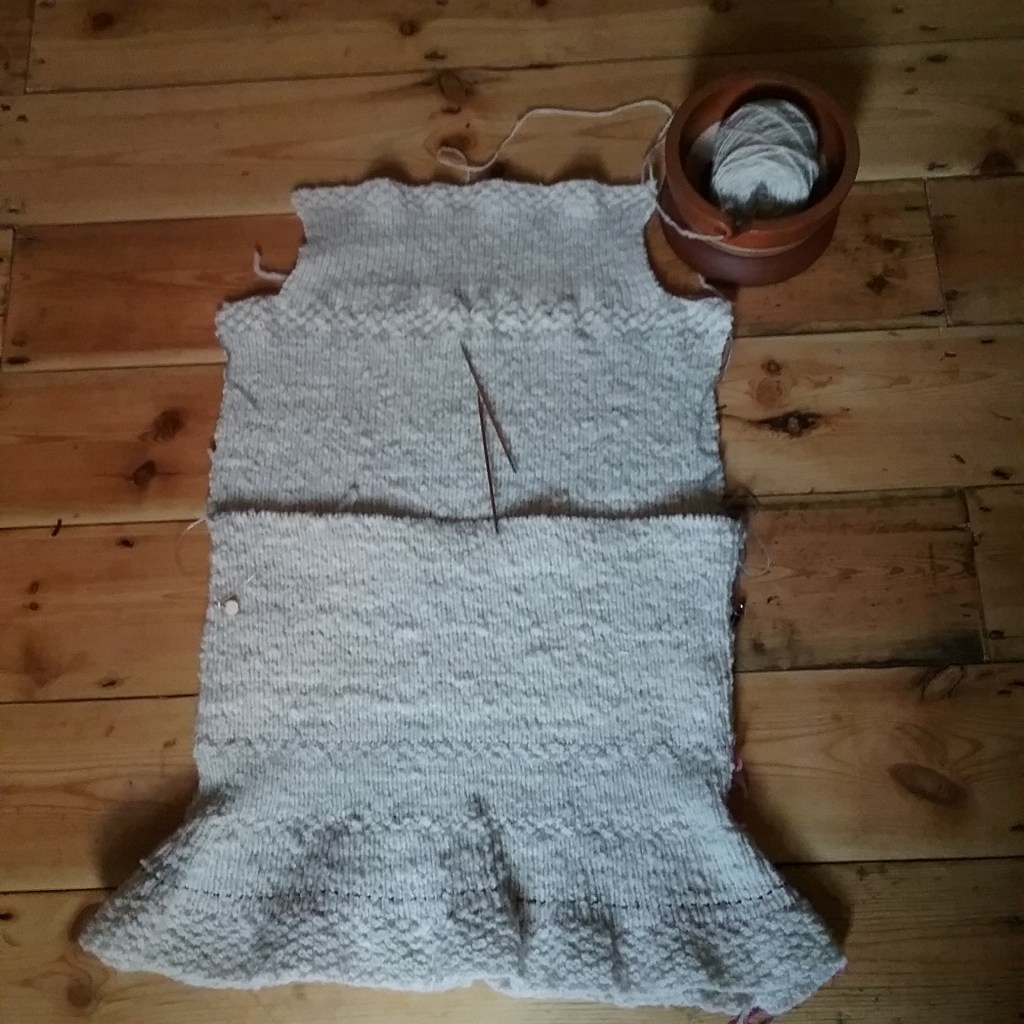
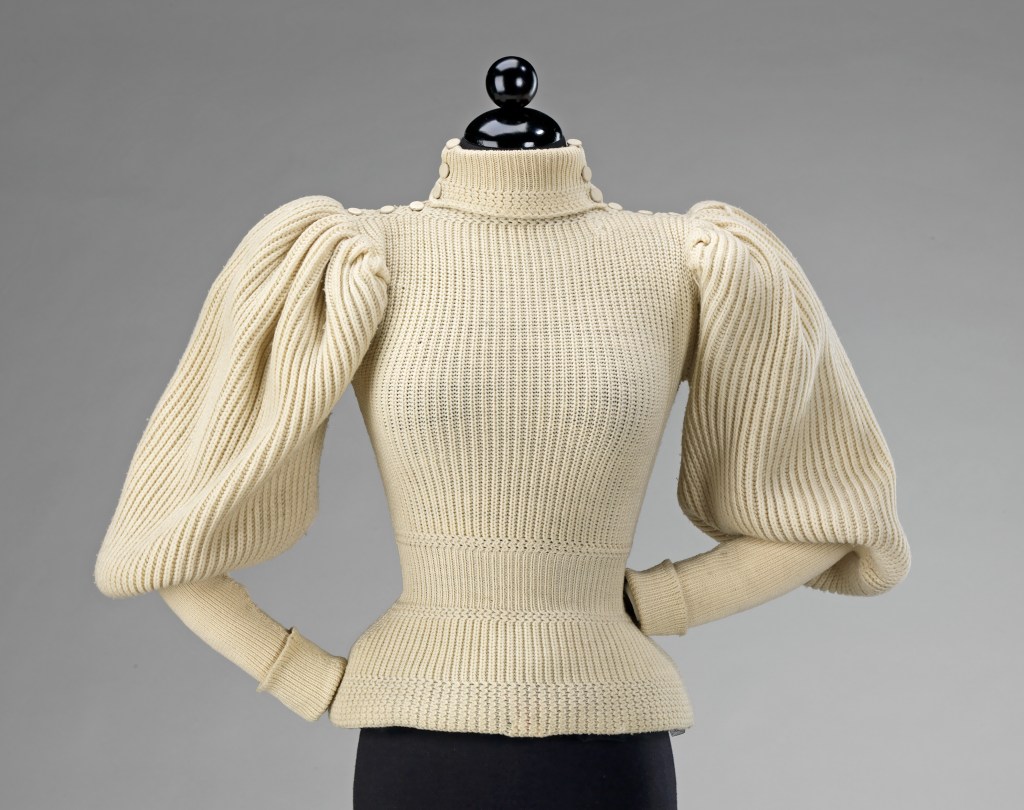
I cast on this project spontaneously back in 2021 after I had to frog a lace mitten with a sizing issue in the pattern. I’ve never knitted anything as big as a jumper before as I generally find myself losing interest in long lengths of repetitive knitting, but I’ve wanted a proper Victorian cycling jumper for a long time now, so after coming across an original pattern online which is nearly identical to a jumper in the collections in the MET museum, I decided to give it a go. At the suggestion of my friends I’ve also made a short video of the process at the bottom of the post.
Patterns & Research
The pattern I used is style No.2 Ladies’ and Misses’ Sweater (Pg. 167-168) from the book Fancy and Practical Knitting which dates to 1897 and can be found for free online here at Archive.org. My first challenge was deciphering the pattern; although knitting is much the same throughout the years, Victorian directions can be trickier to follow, particularly since some things that aren’t common knowledge now are assumed known.
The pattern instructs the use of 3 types of needle: no.12 steel, fine steel and ivory needles, which are not directly comparable to modern sizes. Fortunately this pattern and similar were published in many knitting pamphlets, and several pattern designers have created modern translations (so if you want to make this jumper the easy way, I highly recommend looking one up). Most of the designers state the gauge and needle sizes required on their pattern requirements, so after seeing what several patterns used and doing a quick swatch, I opted to use two sizes of needle (3.75mm & 2.75mm) since both of these worked with the diameter of my handspun yarn. Where the pattern mentioned No.12’s I used the 3.75mm and the 2.75mm were used in the place of the ivory and fine steel.
My yarn selection wasn’t particularly considered, the Clun Forest I’d started spinning that year (thin and chain plied with the intent of weaving it) was sitting next to me when I decided to swatch and happened to be the right gauge. Unsure how much yarn this project would use, I also had two fleeces worth of it, so I knew I wouldn’t run out. In retrospect the chain ply made it easy for me to spin small amounts while I was knitting the jumper and also gave the fabric a bit more structure than if I’d used a drapey yarn, so I’m pleased I opted for this fleece.
Despite wanting to follow the pattern closely for historical accuracy, I decided to knit the jumper on circular needles in the round up until the armscye instead of flat like the pattern instructed. There were several reasons behind the decision, firstly I wanted to be able to try the jumper on while I was knitting to check it fitted rather than reaching the end and having to start again (Ankany who used the same pattern on Youtube ran into fit issues), I also wanted to avoid bulky seams and didn’t want to injure my wrists holding more and more weight on straight needles. To account for this I wrote down the original pattern line by line so it read as a series of clear steps, but included both sides as if it were on circular needles. I also noted the number of stitches for each line and how many inches the jumper was at each part (the pattern states 8 sts per inch). I could then do the following:
Work out the proportions of the original pattern to compare against my own – there is a 5″ difference between the waist and hip measurement which matched my proportions exactly, so I didn’t need to edit the number of increase/decrease sts.
Re-write the pattern adding an extra 8 sts for every inch increase I needed to match my measurements. I also included the number of stitches that should be on my needles at each line so I could easily check I hadn’t gone wrong as I knitted.
Knitting
After checking my pattern thoroughly and comparing it against the original I finally cast on, placing a marker at the start and halfway point between back and front of the jumper and began to knit. Since this is knit in 1×1 rib with a few rows of ‘fancy’ basketweave pattern I didn’t have to change which stitches I was using for the circulars, just to be aware of it when it came to the decreases. Since this was my first big project and I really struggle to pick up rows with the stitches in the right direction after ripping work back, I decided to place several ‘lifelines’ as I knitted each section. These were annoying to extract and I didn’t end up needing to undo anything, but I’m so glad I had them there.
I made quite good progress reaching the underarm around May 2022 and then wondered how I was going to split the jumper so it was back to being knit in two halves. Not wanting to get it wrong, I put the jumper aside for around 6 months before having the embarrassing realisation that I didn’t have to take it off the needles at all and could just knit back and forth on one side of the jumper until the cast off edge and then join the yarn to work on the other side as I had a long cable! After that I was able to carry on following the pattern as per the original, constructing buttonholes at the front as directed.
*As a side note to anyone wanting to make their own, I have realised that the one thing I didn’t check was the proportions of the neck. When decreasing for the neck, the pattern instructs you to ‘cast off 14 sts, knit to within 14 sts and cast off those 14sts’. This means the extra width I added to the jumper overall was translated to the neck, making it slightly wider than the pattern illustration shows. Since my fabric is quite stiff it doesn’t make much difference and looks nice aesthetically, but a drapey yarn might have struggled to hold up the voluminous sleeves.
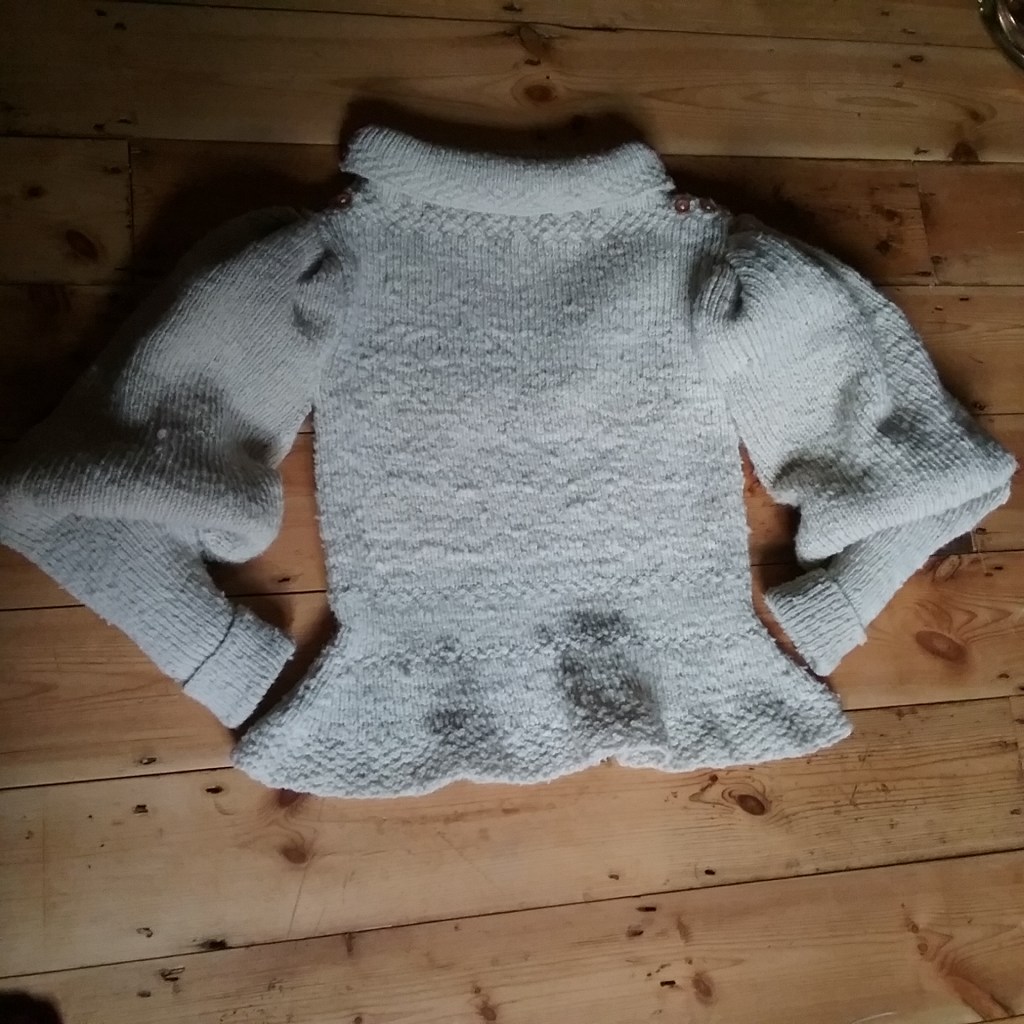
After casting off the main body, I began the first sleeve. The sleeves are knit from the top down and get sewn in with pleats, so I knitted it flat and then joined to knit in the round after the first 4 rows of fancy pattern, decreasing from a 50″ to 14″ cable and finally to dpns throughout. The sleeve looked odd at this stage and I thought I’d gone horribly wrong, but kept going and when I tried the sleeve on, I realised the decreases become the structural part of the sleeve puff. Then it was time for sleeve number 2, which seemed to take much longer to knit (probably because I kept running out of yarn and had to card and spin some more).
Assembly
After knitting the jumper in the round, assembly was quite easy, if time consuming as I kept trying it on to make sure everything was positioned correctly. I sewed buttons to the back portion as directed where they overlap, however the pattern states that where the collar turns the buttons should be sewn to the back of the jumper so they show when it’s folded. With the buttonholes on one side of the collar this doesn’t logically work, but I found it was possible to overlap the buttonholes to correspond to the buttons sewn as the pattern directs if there is a twist in the fabric (it’s more clearly shown in the video below). I’m not sure if this is what the pattern is instructing, but I can’t figure out any other way using only the amount of buttons they call for (and for all of them to be functional), the example in the MET museum also looks like it could have a twist halfway too.
After sewing on all 16 buttons I pinned in the sleeves, adding box pleats as directed. I made slightly fewer pleats since my fabric was stiffer and I have never before sewn a such as thick fabric (often 4-5 layers!). Thankfully it was knitted so my needle didn’t have much problem passing through and securing everything with a strong backstitch. I then wove in all the ends and the project was finally finished…
My JumperJumper at the MET Museum
I didn’t keep track of my yarn yardage, but did attempt to time roughly how long it took me (although I wasn’t strict about this). I spent approximately 207 hours knitting, while carding, spinning & plying took a further 20 hours (though this is more difficult to be exact about since I didn’t time everything and used both hand and drum carding). Rounding up to account for skirting, washing and assembly, the whole project took me a minimum of 230 hours to make.
Overall I’m really pleased with how this came out, despite it taking so long. Though I’ve done a lot of knitting on the blog, it’s not my strongest fibrecraft (but I do like a challenge!), so for a first jumper I’m pleased. There are things that I would do differently (spinning all my yarn at the same time so it’s the same shade of fleece and easier to keep the same size for example), but I love how warm and comfortable it is and the sleeves are incredibly fun! I’m much less intimidated by large knitting projects now and I’ve got better at translating knitting patterns on paper before I start knitting.
As 2023 draws to a close, I want to thank all my readers for their support over the past year. It’s been busy; I went to my first in person yarn festival, completed another Tour de Fleece, participated in Wovember on both my blog and Instagram (for which I was very lucky to win some wonderful goodies from 5 sisters farm in the prize draw), experimented with filming some of my spinning and caught up on writing some long awaited blog posts.
I’ll be back in 2024 with more fibre adventures, I’m hoping to finish my long standing Victorian jumper project, and begin some other projects that have been on my list for some time. Working with fibre from scratch is a slow process, so thank you all for your patience while I tackle big projects. I’m also keen to hear from you – are there any blog posts you’ve particularly enjoyed and would like to see more of, or things that you would like me to explore? I’m always open to suggestions – let me know in the comments!
In the meantime, I wish you all a merry festive season. See you in the new year!
Happy Wovember! This year I’m travelling back in time to explore the lasting impact wool has had on our culture. I’ll be exploring various magical and mythological stories and imagery to see what links them to wool and if there was any truth in these tales.
Ancient Magic
The ancient Greeks were not the only ones to worship beings of fate; The Norns were the old Norse equivalent to the Moirai and could weave a person’s destiny. Norse women could also practice Seidr, a type of magic often using a symbolic distaff to bring about a change of fate for good or evil1. Women who practiced this magic would have been highly respected, but also probably feared (any men practicing Seidr were ridiculed as the practice was seen as ‘unmanly’). Archaeological evidence shows that drop spindles were often buried with their owners, perhaps to occupy them in the afterlife, or perhaps because these tools were so important, both practically and spiritually. Even today, the intent with which something is done is considered important in everything from modern witchcraft to mindfulness. As crafters we make with intent, whether this is to improve our skillset, explore something new, or simply to unwind.
Gatherings of Witches
In the early 20th century, household witches in Finland were reported to cut wool from neighbours’ sheep to weave invisibility cloaks and bring about bad luck2. This may therefore have linked the practice of witchcraft to those who could spin. The beginning of an account from an American periodical in 1880 describes a gathering of witches at their ‘headquarters’ where the author is greeted by a woman spinning3. This description is reminiscent of the spinning bees of the 18th century in the American Colonies.
Women would gather and chat while they spun in order to boycott buying goods from Britain4; it was a way for women to have political expression and would have been an ideal place to gossip and share knowledge (through spinning songs for example). Around the world, groups of spinners through the ages would bring their work together to save lighting and keep each other company. Spinning bees were places predominantly occupied by women and were often portrayed as being unruly gatherings (paintings portraying spinning bees are filled with innuendos). Whether this was invented by those who disapproved of women having a space of their own, or had a ring of truth, I cannot say, but it is not out of the question for spinning bees to have subsequently been associated with witchcraft.
Though the link between wool and witchcraft has historically had negative connotations, many practices remain today. There is a wonderful global community of spinners, weavers, and fibre artists all teaching and keeping each other company, and we value items that have taken time, skill, and energy to create. We marvel at the beautiful creations of others and the process of creating itself. Though it is doubtful that spinning and weaving can magically change another’s fate, they are expressive and mindful crafts that bring people and ideas together and I think perhaps that there is a magic in that.
I hope you’ve enjoyed this tumble down the rabbit hole into the weird and wonderful cultural history of wool. I have tried to include a variety of different stories focussed on magic and myth, but there is much more, so if any of this has piqued your interest then I heartily encourage you to look into this further – I had a lot of fun researching the more unusual wool history to write these posts.
As we reach the end of Wovember it only remains for me to encourage you to use wool, check your labels for fibre content and visit Team Wovember or Love Wovember for lots more information. I will be taking a break from posting in December while I catch up on projects and making gifts, but I will return in the new year hopefully with some new finished projects.
Happy Crafting!
Wovember posts from previous years can be found below:
Stark, L. (2018) ‘Narrative and the social dynamics of magical harm in late nineteenth- and early twentieth-century Finland’, in W. De Blécourt and O. Davies (eds) Witchcraft Continued. Manchester University Press. Available at: https://doi.org/10.7765/9781526137975.00008. ↩︎
Happy Wovember! This year I’m travelling back in time to explore the lasting impact wool has had on our culture. I’ll be exploring various magical and mythological stories and imagery to see what links them to wool and if there was any truth in these tales.
Fairy Tales & Folklore
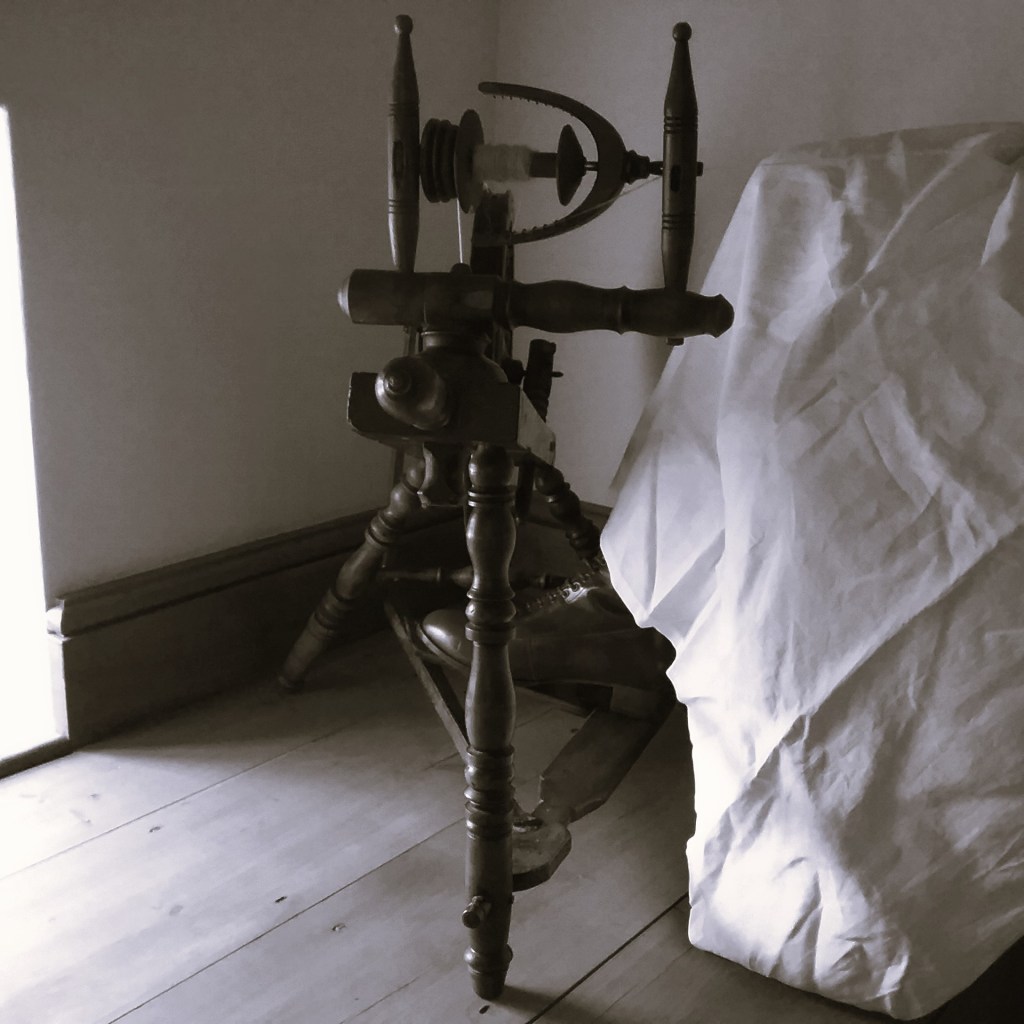
Many traditional children’s tales make reference to spinning and weaving; Rumpelstiltskin spinning straw into gold (likely a reference to flax spinning) and Sleeping Beauty being pricked with a flax splinter originally, but more traditionally a spindle (though I take issue with Disney portraying her pricking her finger on the distaff of a wheel that would never have had a spindle, but that’s a discussion for another time!). In both these tales the spinners are tricksy beings bringing the heroine great distress (and perhaps they also give a safety warning about working with spinning equipment), but there are tales of more benevolent creatures.
In Scottish folklore the fairy Habetrot agrees to spin flax into yarn on behalf of a girl who prefers exploring to sitting with a distaff and is distressed that she will never find a husband unless she can spin. In the tale Habetrot and her friends not only spin the yarn for her, attracting the prince who marries her, but also ensure that she will never have to spin again (Habetrot and her fellow spinners are described as having misshapen lips from constantly moistening their fingers; upon seeing this the prince declares that his new wife should never spin again lest the same fate befall her)1. The young girl suffers no repercussions the prince leaves his estates fleeces by Habetrot’s dell to be turned into yarn.
Children & Wool
It is odd that so many fairy tales seemed to discourage spinning in a time when children, particularly young girls would have been expected and encouraged to learn how to spin, since, as discussed in the Fate & Destiny post, it was one of few ways women could have some financial independence. The word ‘fairy’ is thought to have originated from the old French translation of the Latin word for Fates, since it was believed that much like the Moirai, fairies could change a person’s destiny for good or evil through their actions. This is interesting, since the ability to spin well could literally change a person’s destiny by earning them a wage, so although fairy tales are more extreme examples of a change of fate, they do still illustrate the point.
Children would be encouraged to help collect and process wool and would learn skills from a young age. Up until the establishment of elementary education in 1880, girls from working class backgrounds were encouraged to knit woollen garments to supplement the family finances and prevent them from being idle (particularly if they were in the workhouse). Informal schools were set up to teach, and some accomplished knitters were younger than five years old2! Though the gender bias associated with wool was restricting, working class women at the time had very few rights and little education, so learning a skill from a young age meant they would be more likely to find legitimate paid work. Being able to produce your own clothing allowed you to be more self-sufficient and less reliant on others, so perhaps the fairy tales don’t simply illustrate how spinning or magic could suddenly improve your lot, rather they remind children that if they patiently practice a craft, they won’t have to rely on others or make dodgy deals with fey creatures to prove a claim to a talent they never had.
If there are any other good fairy tales involving fibre crafts that I should hear about, let me know in the comments below. Next week I’ll be exploring some of the links between wool and witchcraft.
Wovember posts from previous years can be found below:
Happy Wovember! This year I’m travelling back in time to explore the lasting impact wool has had on our culture. I’ll be exploring various magical and mythological stories and imagery to see what links them to wool and if there was any truth in these tales.
The Moirai
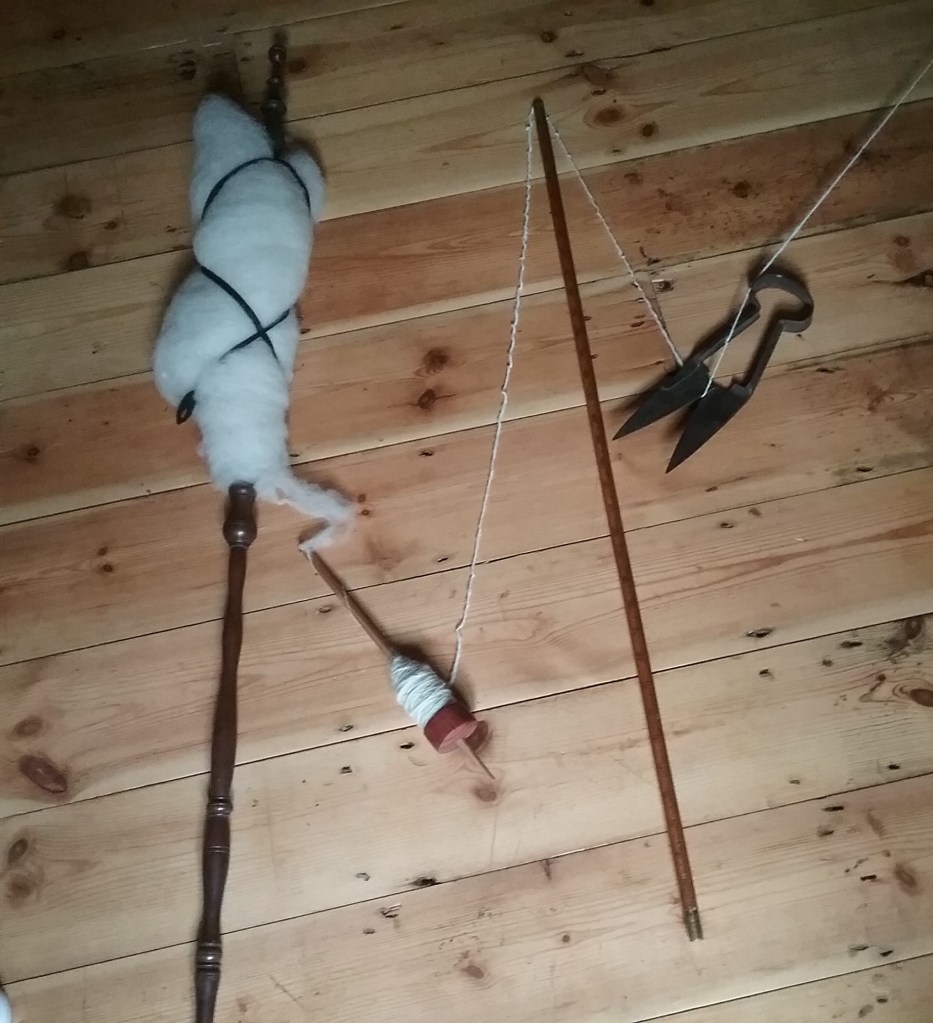
The Moirai or ‘fates’ are three ancient Greek goddesses who were responsible for deciding the destiny and lifespan of mortals. Represented as three women (sometimes young and beautiful, sometimes old and ugly) each was responsible for a different task of apportioning life. Clotho was the spinner, often pictured with a distaff and spindle for spinning the thread of life; Lachesis was the allotter who used a measuring stick to measure the length of the life and Atropos was the ‘inflexible’, responsible for rendering the decision unchangeable by cutting the thread with her shears. The fates decision could not be changed even by Zeus1, arguably making them the most powerful figures in Greek mythology. The one individual said to have outwitted them met a swift and sudden end, so it is unsurprising that they are often portrayed as the villains.
The Power of Spinning
The image of the fates using spindle, stick and shears has endured throughout the years and is interesting to unpick. It is curious that such powerful beings were given such commonplace tools, after all, spinning would have been part of the daily chores at the time. However, wool had significant value; sheep were a source of nutrition, but the wool they produced could be turned into cloth and sold or traded, allowing individuals to make and afford basic necessities. Despite being a common resource wool was a necessity; the humble drop spindle would lay the foundations for the industrial revolution many years later, the quality of a fleece for spinning would depend on the shearing and a greater yardage would determine the price. So, although ordinary, the Moirai’s tools hold enormous potential, which seems apt considering their function as allotters of destiny.
Spinning was a task performed nearly exclusively by women2. It required very little equipment and was portable; distaffs could be secured in a belt allowing women to spin while walking, cooking, or caring for children. Spinning was not financially lucrative, it provided women with a meagre wage even up until the industrial revolution3, but would have given them some limited financial independence. Weaving was a practice dominated by men, arguably because it was a form of self-expression that women were not often entitled to4 since stories could be woven into fabric (which reminds me of the poem ‘Dangerous Coats‘ by Sharon Owens). Spinning was therefore both a source of independence, but also repression, so it is interesting that such powerful beings should be portrayed as lowly spinners.
One possible reason for this is the romanticisation of spinning in art. An internet search of paintings depicting spinsters provides multiple images of women elegantly (and impractically) draped at a wheel, delicately turning fibre into thread. The Moirai are no exception to this; though often cast as the villains, many sculptures and paintings depict them gracefully, one major difference being that the Moirai are more realistically poised to spin. Perhaps this distinction is meant to make them appear less feminine than other mortal muses, highlighting their independence and immortality.
Though the Moirai are mythical beings, their depiction provides an insight into the importance of wool to everyday life and the role of women in textile production at the time. The thread of life symbolising the livelihood created by wool and the Moirai representing the women fated to spin but laying the first seeds of their independence.
If I’ve missed out anything important feel free to let me know in the comments below. Next week I’ll be exploring some wool related fairy tales.
Wovember posts from previous years can be found below:
Humphries, J. and Schneider, B. (2019) ‘Spinning the industrial revolution: SPINNING THE INDUSTRIAL REVOLUTION’, The Economic History Review, 72(1), pp. 126–155. Available at: https://doi.org/10.1111/ehr.12693. ↩︎
Pantelia, M.C. (1993) ‘Spinning and Weaving: Ideas of Domestic Order in Homer’, The American Journal of Philology, 114(4), p. 493. Available at: https://doi.org/10.2307/295422. ↩︎
Happy Wovember! This month is all about celebrating wool; previously I’ve discussed the importance of wool, correct product labelling, shared some of my fibre book recommendations and sources of woolly information. Wool is an incredible material, both due to its rich history, but also the role it can play in reducing environmental harm. It has been clothing humans for thousands of years and is embedded in our culture. This year I’m travelling back in time to explore the lasting impact wool has through some magical/mythological stories and imagery. Why was wool referenced so much? Was there truth in these tales? This month I’ll be exploring wool’s influence on these legends here on the blog and taking part in the daily photo prompt on Instagram.
Jason & The Argonauts
As with many myths and legends, there are various interpretations of the story, but most sources tell the following tale. King Aeëtes of Colchis placed the fleece of a golden ram that saved the children of Athamas from Zeus on a sacred tree guarded by a serpent that never slept.
Across the Black Sea, Jason, son of Aison, rightful king of Iolkos returns to claim his throne from Pelias, his father’s half-brother. Reluctant to cede his crown, Pelias sets Jason an impossible task; he will give Jason the throne if he brings him the golden fleece of Colchis. Along with a team of Argonauts, Jason faces perilous waters and journeys across the Black Sea to Colchis. Upon the Argonauts arrival, King Aeëtes sets Jason two further tasks in return for the fleece; he must harness two fire breathing bulls to a plough and defeat the warriors grown from the teeth of a dragon. With the help of the King’s daughter, a sorceress named Medea who provides him with the means to succeed in return for his hand in marriage, Jason accomplishes the tasks. King Aeëtes still refuses to part with the fleece, so Medea drugs the guarding serpent while Jason steals the fleece before they both escape on the Argo.
Gold Extraction in Early Georgian States
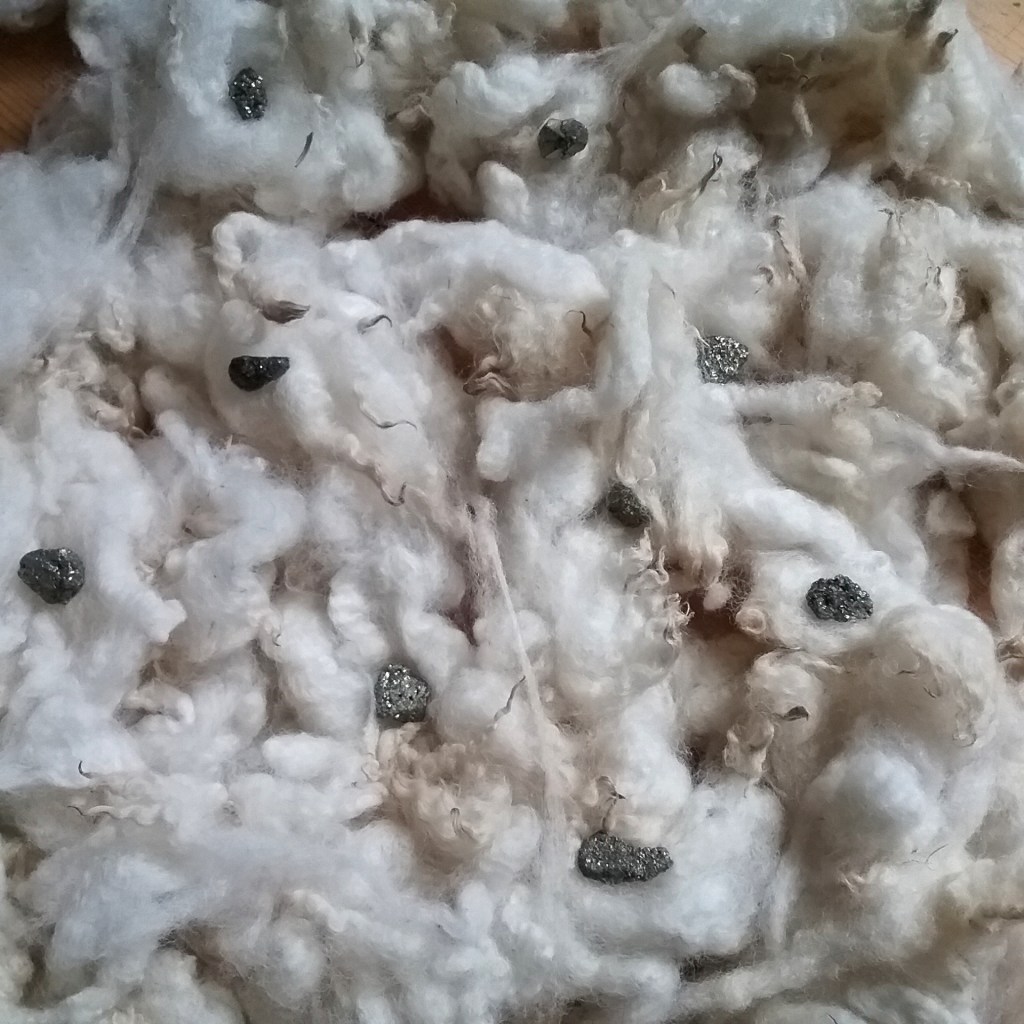
Myths are full of fantastical objects and there are many different interpretations regarding the significance of the golden fleece. Historically textiles were expensive and generated significant capital for those who worked with them (the English economy was significantly supported by the wool trade), so metaphorically, the fleece could simply represent great wealth. There is however a much more literal suggestion involving a method of extracting gold from rivers. The Svaneti region in modern day Georgia has high river gold deposits and is thought to be the site of the ancient kingdom of Colchis1. Ancient tribes in this area would strategically place a sheepskin or fleece in the river to trap the gold grains making a ‘golden fleece’ which was then washed, and the grains sifted from the wash water. The practice of gold panning is quite a tourist attraction in Svaneti nowadays, although the equipment is slightly different2. The practice of using a sheepskin as a sieve was not constrained to the Black Sea region; many bronze age artifacts in the UK and Ireland thought to be made from alluvial gold sieved through sheepskin3.
It seems therefore that the story of the golden fleece may not be as fictional as it first sounds. The riches of Colchis were well documented at the time by Pliny the Elder and Homer, so could the Argonauts have in fact made the journey not to steal from a serpent, but to learn the methods of Colchian gold extraction and bring this knowledge back home to Iolkos? There is another theory, that the term golden referred to a tan coloured sheep native to Colchis4, however coloured sheep were usually less favoured as their fleeces would not take up dye as easily, so why the Argonauts would journey to bring back a coloured fleece is unclear, but certainly highlights the importance of wool at the time.
Greek mythology has a lot to unpick so I’ve tried to be brief, but if there’s anything I’ve missed out, do let me know in the comments below. Next week I’ll be exploring the association between wool, fate and destiny.
Wovember posts from previous years can be found below:
Okrostsvaridze, A., et al., A modern field investigation of the mythical “gold sands” of the ancient Colchis Kingdom and “Golden Fleece” phenomena, Quaternary International (2014), http://dx.doi.org/10.1016/j.quaint.2014.07.064 ↩︎
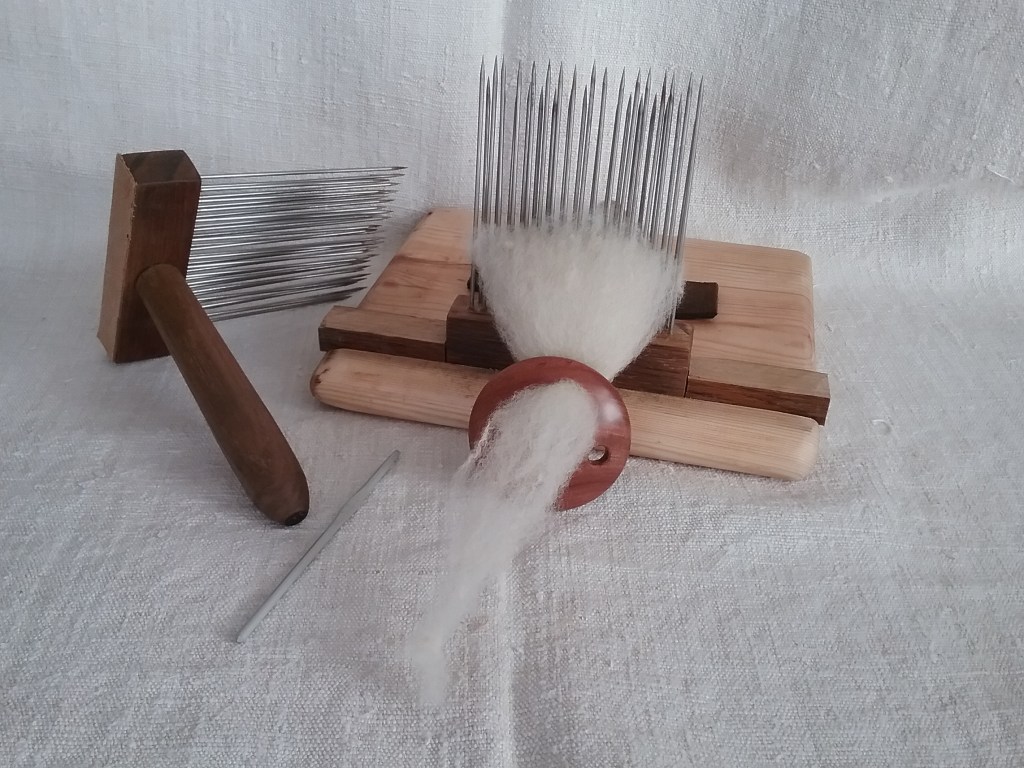
There are several fleeces in my stash that I have put to the side as the fibres are too long to successfully card. There are two methods generally used to prepare wool depending on the staple length of the fleece, namely carding for short staples and combing for long staples. Some fleeces can be carded or combed depending on the intended use (a good example I’ve worked with being the Romney), but others will favour just one method – carding a long staple fleece is hard work and the fibres can become tangled, while combing is very difficult with a short staple.
Wool combs are expensive to purchase and tend to hold their price second-hand. After realising that I needed a pair of combs, but feeling I couldn’t justify spending a lot of money, I decided to see if I could DIY some for myself. Several people have come up with ingenious ways of DIYing combs, from using beekeeping combs to pet combs and a google search will bring up many different results. Antique wool combs come in various guises too, some are simply nails in wood and others have layers of fine sharp spikes. After looking at a range of commercial, DIY and antique combs I decided to try and fashion something with two rows of tines that was a medium sort of size.
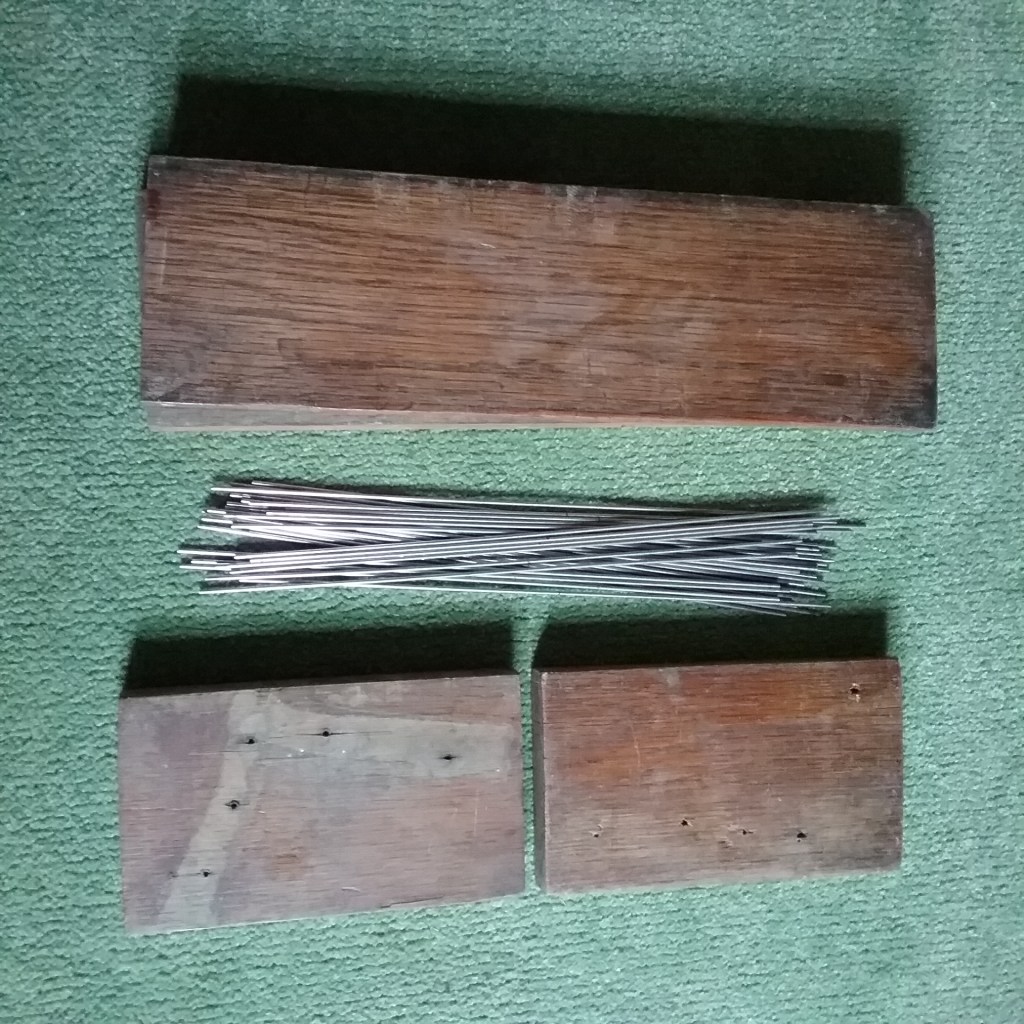
I began with sourcing materials; the paddle portion of the comb would be made from the salvaged wood of a bookshelf made by my Grandfather, the handles from an offcut of oak and the tines from some 2mm stainless steel rods found at the bottom of a craft drawer (it’s important that the tines don’t rust as fleece is greasy and can sometimes need spritzing with water if it gets too static during combing). The stand was made from an offcut of windowsill and a section of leather from a damaged strap found in my Grandfathers shed.
Constructing the combs:
My first task was to decide on the paddle size; I wanted the combs to be light enough to be used in the hands, but large enough that they could also be put on a stand. I also wanted to have two rows of tines as I felt these would do a better job of separating the fibres than a single row (most commercial single row combs are finer than my tines would have been). After lots of experimenting within the confines of my materials I decided my paddles would measure approximately 11.5cm wide x 2cm deep x 3cm tall. The wood was cut, sanded and given a coat of oil.
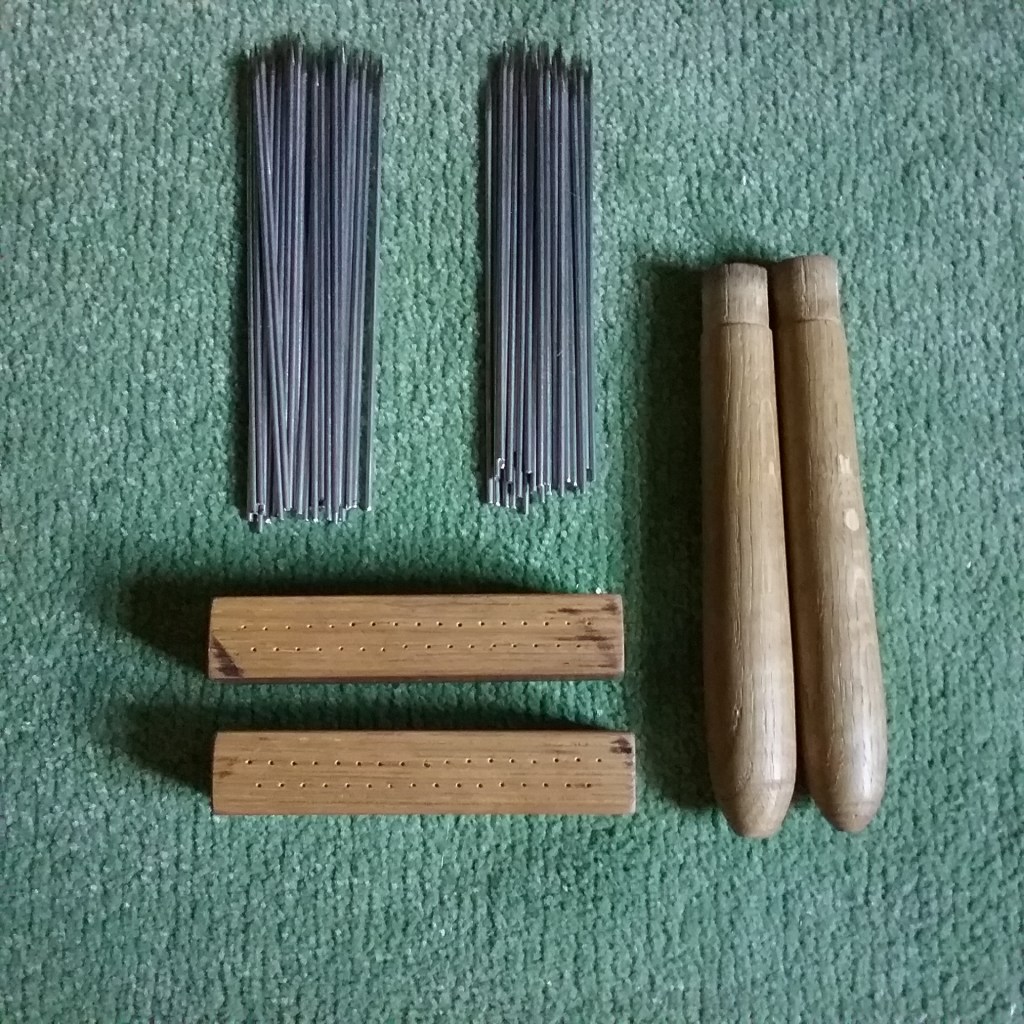
I marked the tines 6mm apart starting 1cm in from each end and offsetting the second row so each tine was positioned in a gap. Each of my combs used 33 tines (16 in the back row, 17 in the front row). Most commercial combs have the back row of tines closet to the handle slightly shorter than the front row. My rods needed to be cut down before turning into combs so I offset the length measurement when I cut them in two so one side was longer than the other. One end of the tines was then ground down to a point. I also turned some simple handles.
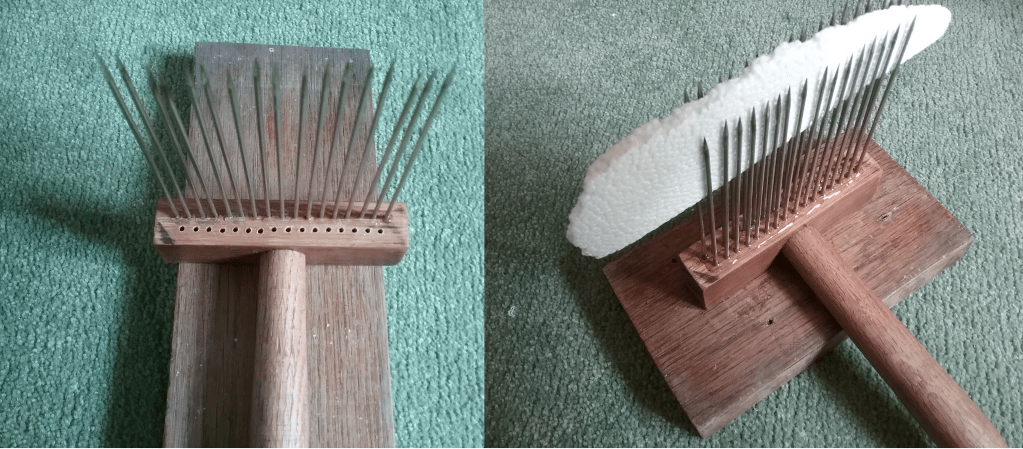
The handles were attached and then holes were drilled through the paddles where I’d marked and the tines fixed in the first row using gorilla glue to secure them in place (the tines go all the way through the paddle so are unlikely to fly out). After 24 hours I could repeat the process on the second row. To keep the tines aligned as best as I could a thin piece of polystyrene slotted between the two rows worked wonders.
To finish off the combs I cut out a thin strip of leather to cover the bottom of the paddle where the ends of the tines were showing and glued it in place.
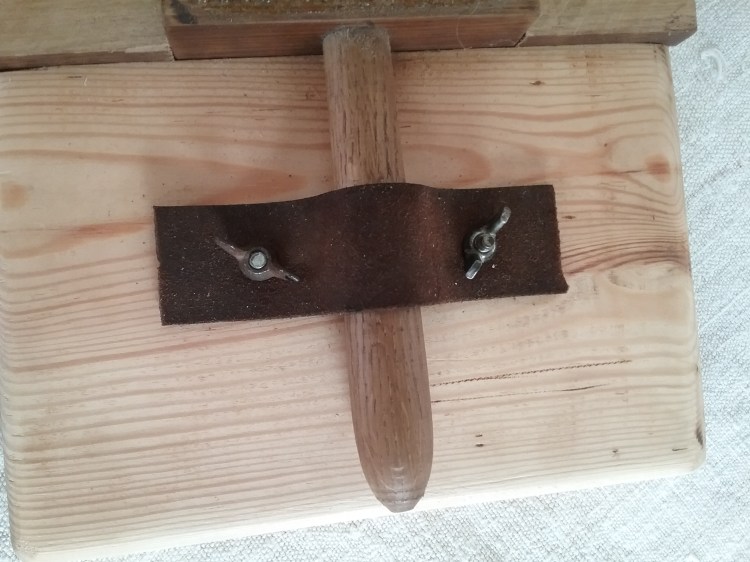
Constructing the base:
Most wool combs have a base that you can clamp to a table to make combing easier and safer, so I decided to construct one. I was confined to the dimensions of the offcut of wood I was working with, but a strip the width of my paddle was chiselled out so the comb could slot in. Two offcuts of wood the same width as the paddle could then be slotted in either side to reduce movement.
To secure the comb at the handle I decided to use leather and add wing nuts either side so the comb could be removed easily. The base itself had plenty of space to be clamped to a table.
Conclusion
The wool combs were a joint effort (thanks Dad!) and I’m very pleased with how they turned out. They make easy work of processing long fibres and are not too heavy. The tines aren’t perfectly straight, but this doesn’t seem to cause a problem. Most commercial tines seem to be a little thicker than the rods I have used, but although there is some flexibility in the tines, it doesn’t seem to be a problem. My tines may be a little sharper than commercial combs, so I am careful when handling them and removing waste fibre. I was lucky that I didn’t have to purchase anything to make the combs, so I can’t factor in a materials cost, but they were time consuming to design and make (though did allow me the option of customising them a little). I’m sure one day I will invest in some professional combs, but in the meantime these are proving effective and producing some beautiful combed nests.
If you have any tips for wool combing or have made wool combs/wool comb substitutes let me know in the comments below!
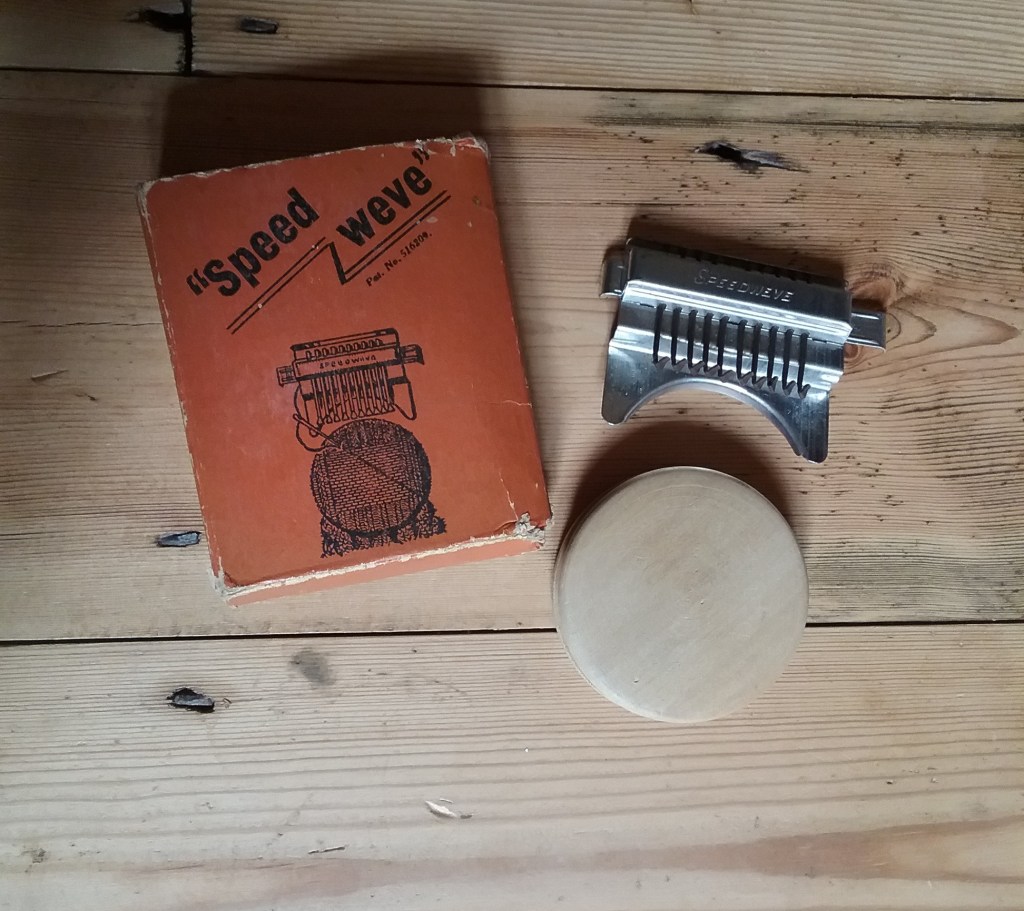
I’m a big advocate for repairing garments rather than replacing them and shun the throwaway culture of fast fashion wherever I can. A darn is one of the most common repairs required and can be used on most fabrics. Darning is essentially weaving without a loom, threads are laid across the fabric forming a warp before a weft is passed through. Depending on the repair, darning can be quite a fiddly and tedious task, so I was excited to discover that in the 1940’s-1950’s A. Chesstock of Manchester manufactured a ‘loom’ to make the process easier. I bought the ‘speed-weve’ at a car boot sale, it was in good condition without any rust and still had the original instructions. I’m always excited to try a new fibre gadget and the instructions are set out in 4 easy steps, so I set out to see if this device helps or hinders my darning.
Step 1 – Setting up
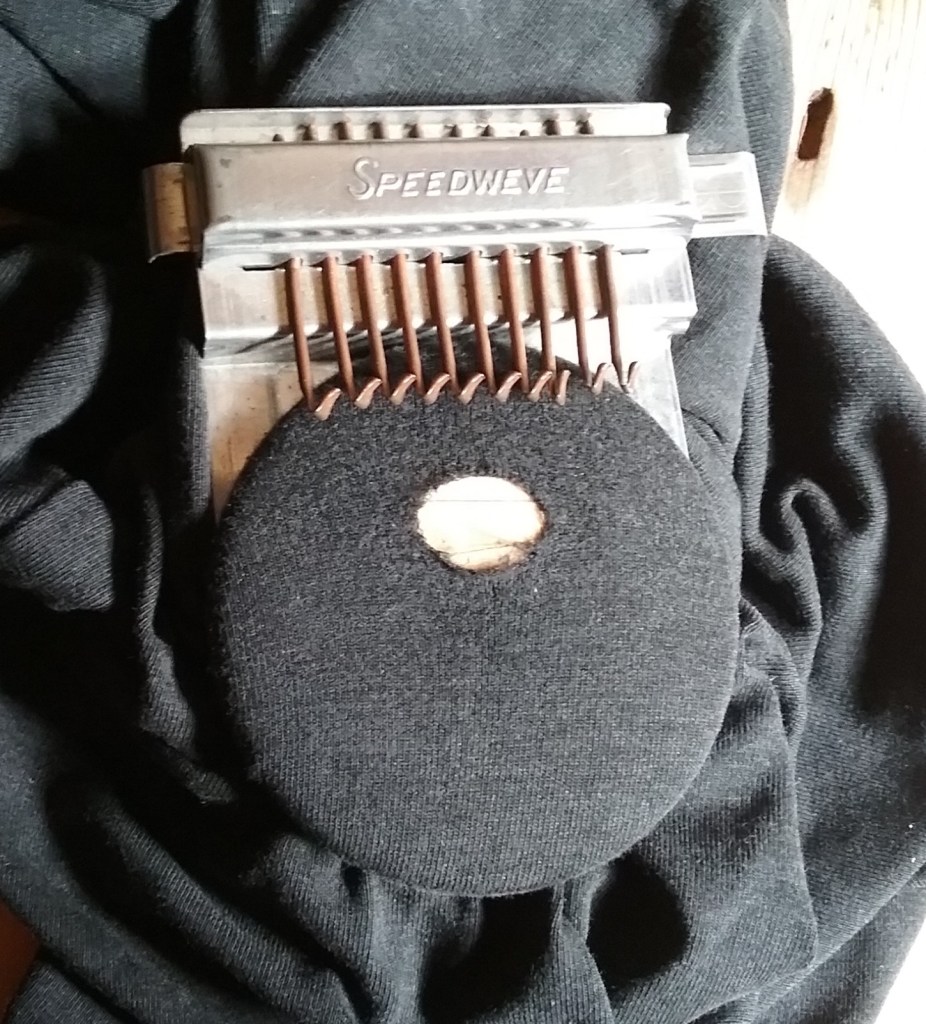
The instructions tell you to darn on the right side of the fabric, to place the wooden disc under the hole (as you would a darning mushroom) and use an elastic band to hold the fabric in place in the groove. Then slot the metal part into the groove and secure with another elastic band. I was weary of using elastic bands in case they snagged the fabric, so opted to use a hairband instead and manoeuvred it over both parts of the loom at once.
The Speed-Weve loom set up for darning
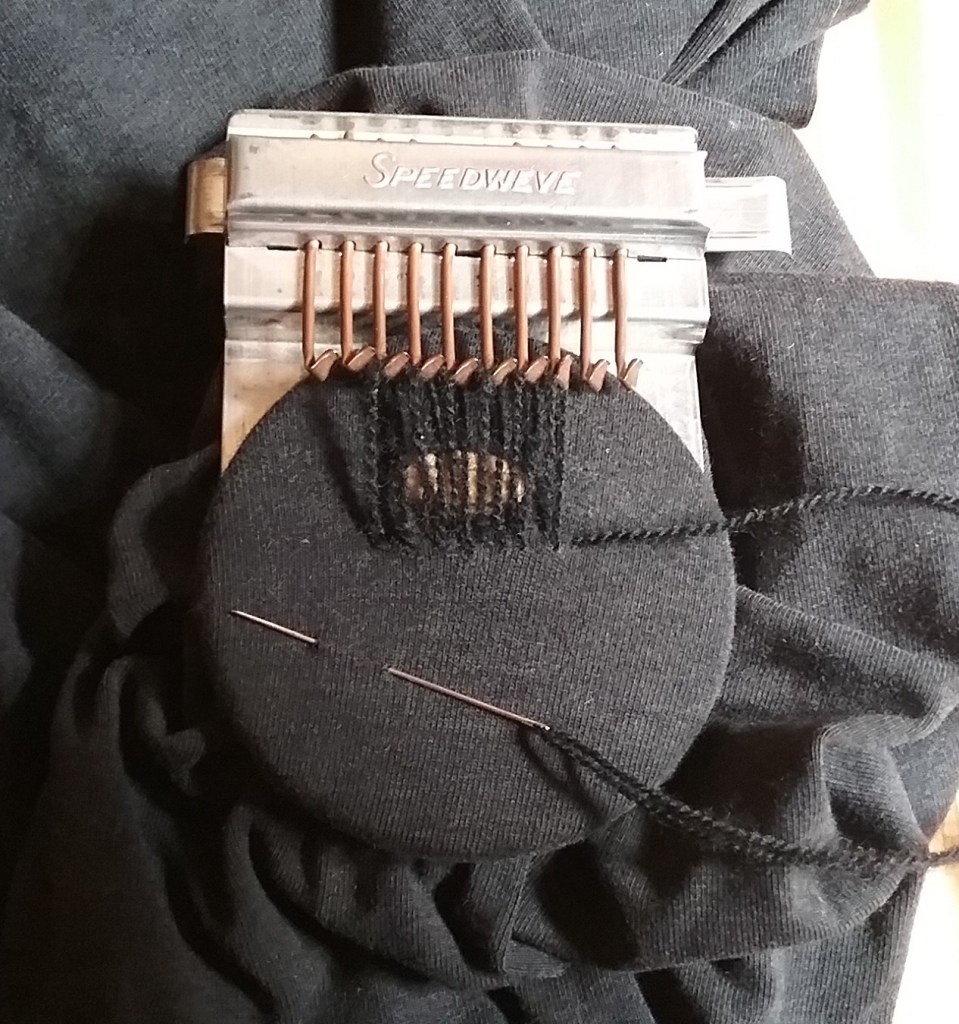
Next we need to add a warp. A thread is attached at a bottom corner of the hole, taken up around the hook directly above and back down to the base of the hole where a stitch is taken to secure it, before repeating the process across all hooks until the hole is covered. As you bring the thread back down from the final hook take another stitch at the base ready to begin weaving.
Warp threads ready for weaving
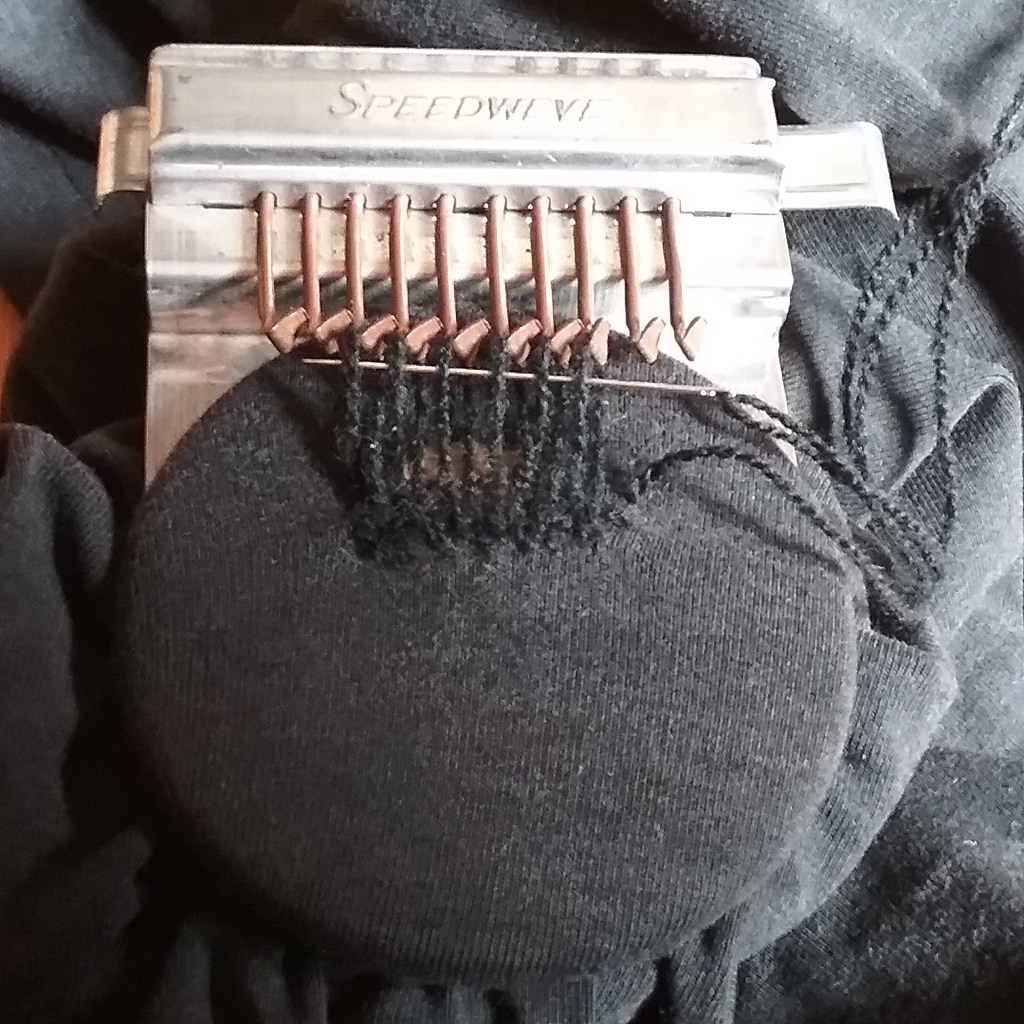
Step 2 – Adding the weft
The hooks on the loom attach to a bar that is pushed from side to side during weaving so they twist back and forth. This motion changes the warp shed as the right & left sides of the loops are lifted alternately every pass, just like weaving on a loom. This means the needle doesn’t have to be moved over and under the threads manually.
First row passing from right to leftSecond row passing from left to right
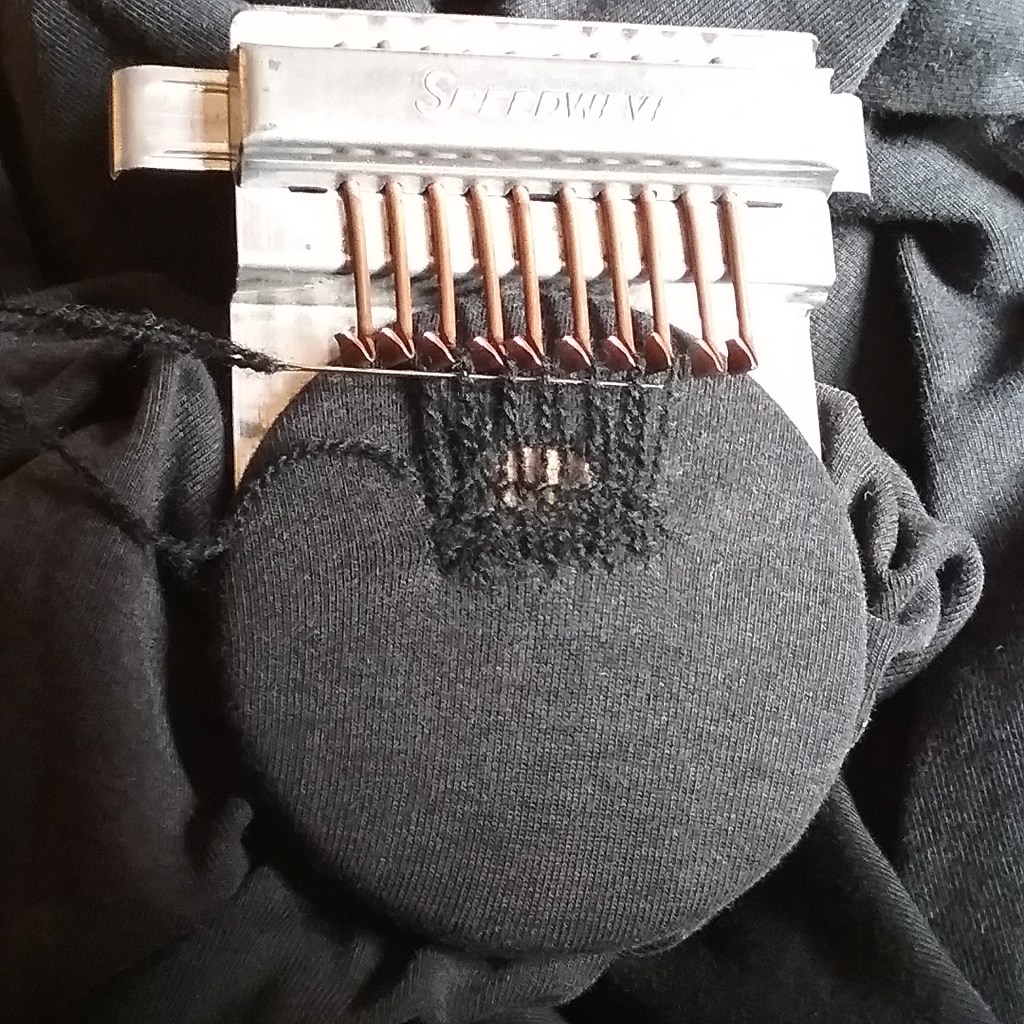
To begin weaving, ensure the hooks are facing either to the left or right and pass the needle through the shed created (under the raised threads). Pull the yarn through and take a stitch to secure it. Slide the hooks to face the other side, push the row you’ve just woven down with your needle and repeat the process back and forth until the hole is covered and the needle cannot pass through the shed any longer. It should look something like this:
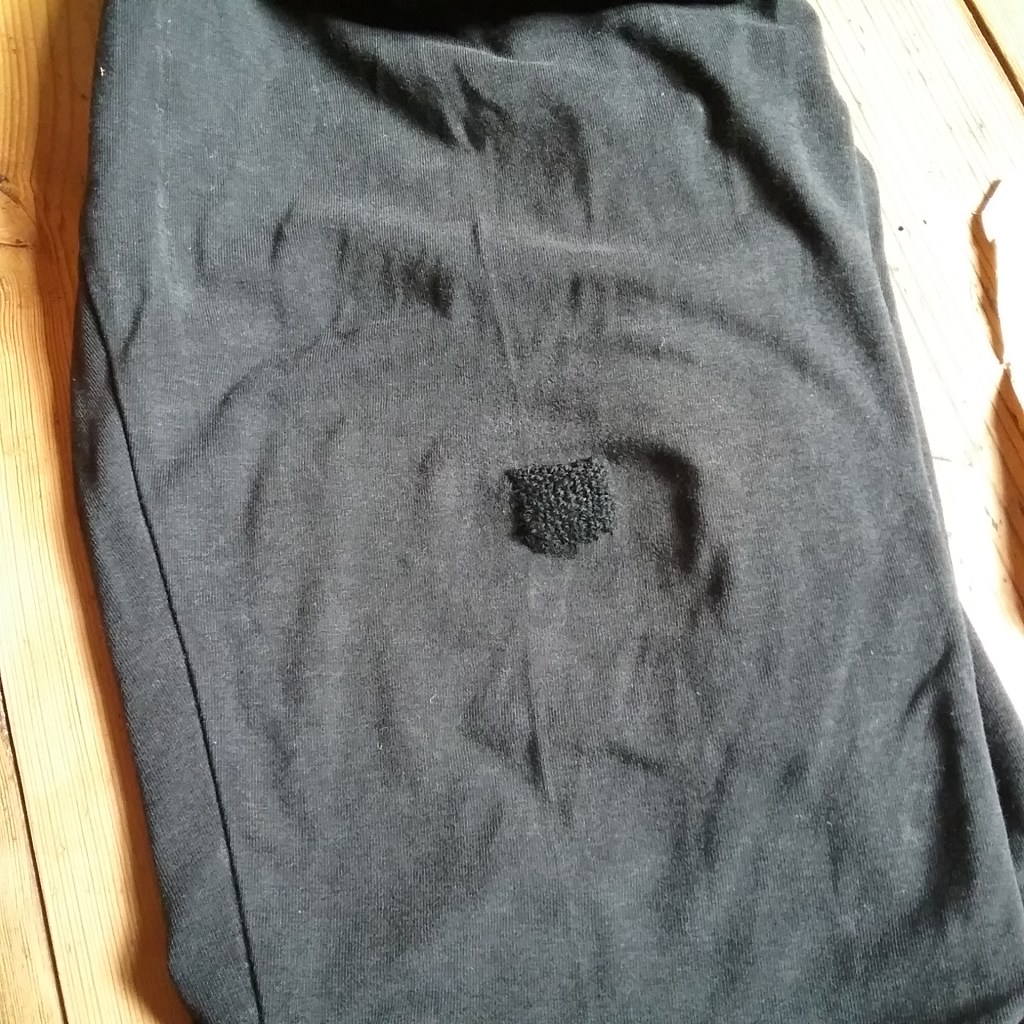
Darn complete ready for casting off
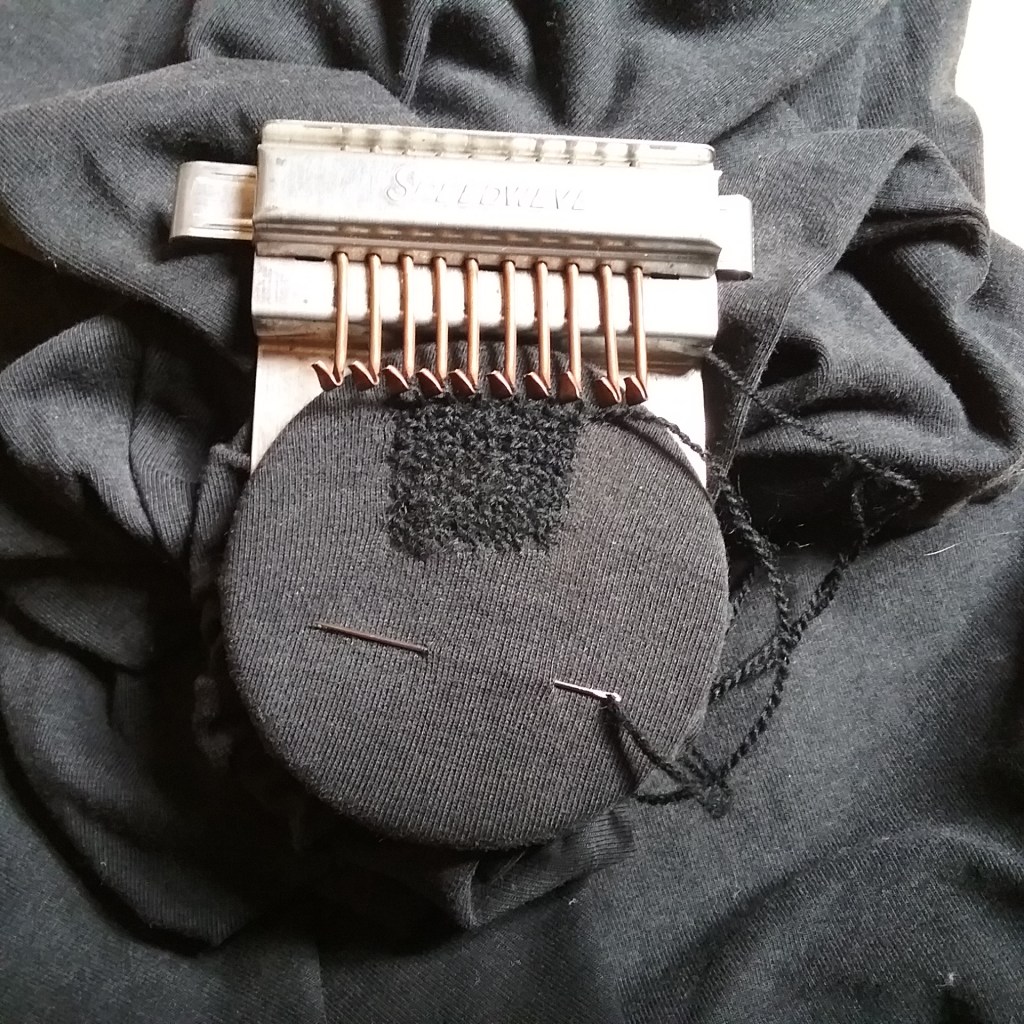
Steps 3 & 4 – Finishing
Push the slider so the hooks are central and remove the hooked part of the tool (this was a little more fiddly for me as I had to move the hairband off the metal section, take the hooks off and then put it back on the fabric). When the hooks are removed, the top of the loops are left behind. These can then each be secured with an overstitch along the row before casting off and removing the disc.
Finished darn with hoops secured ready for casting off
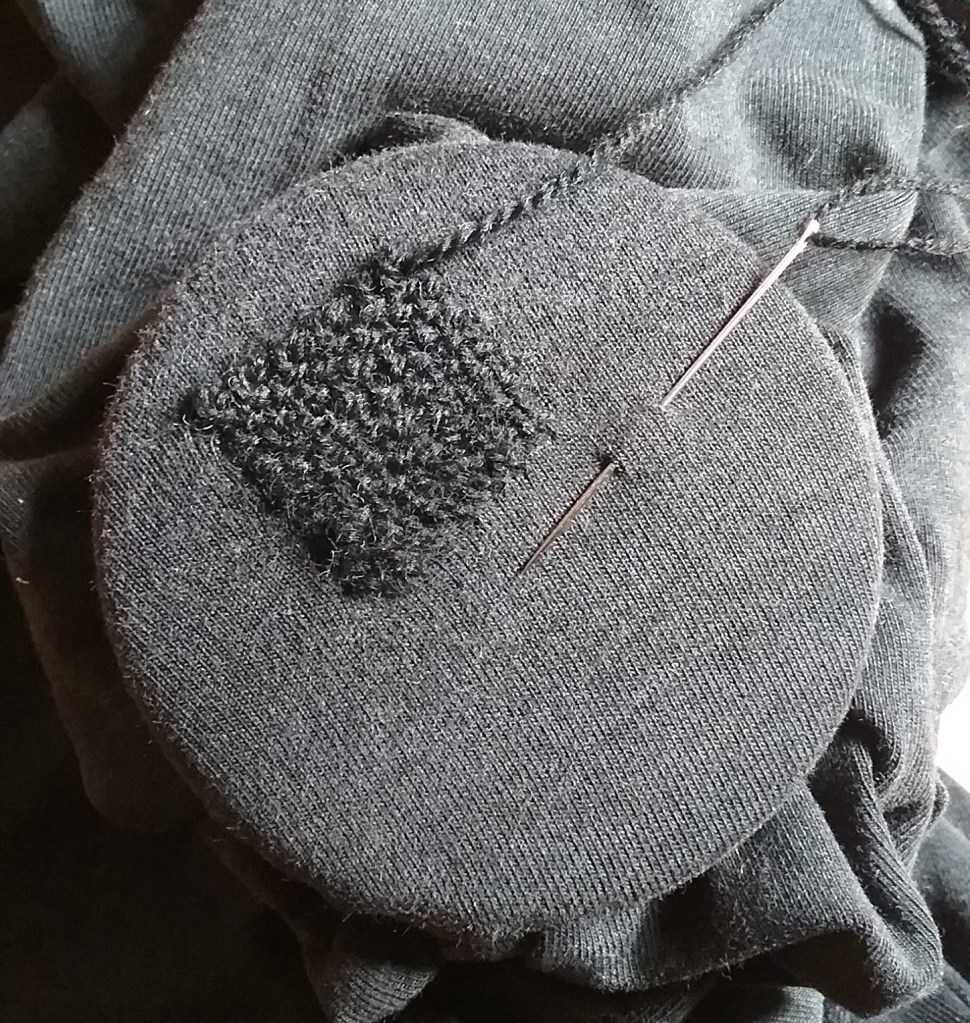
Reflections
Much to my surprise the loom works rather well. As I was darning leggings, I expected the stretchy fabric to cause a problem, but the loom held it securely and kept the threads straight. When darning I would usually choose a thread of a similar size to that of the fabric, however since the hooks are a fixed size and space apart you need a minimum of a 2-ply yarn or the weave will be too open, but if the thread is too thick it will pop off the hooks (not so good if repairing thin weave linen or a thick jumper). I did find that on occasion my needle went through the middle of a warp thread rather than above or beneath it, which was difficult to see with the shadow of the hooks (though this may be because I was working with black).
On the whole I am impressed with the loom, it wasn’t as fiddly as I expected it to be, it kept the stitches even and the whole process only took me about 5 minutes, so I will definitely be using it again. Even though I used a thicker thread than I would normally have done, the darn isn’t too visible, and it will be interesting to see how well it holds up on a stretchy fabric.
If you’ve experimented with a darning loom and have any tips or tricks then I’d love to hear in the comments below.